Air Care Equipment
Zoll Monitor
Radio Operations
This video shows how to operate your handheld radio, helmet radio, as well as the radio equipment in the back of the helicopter.
Handheld Radio

Aircraft Radio

Buddy Lite
General Info:
Infuses by gravity (does NOT control flow rate)
Heats blood and/or fluids to 38 degrees Celsius (100.4 degrees F)
Heats crystalloids at 20 degrees Celsius up to 80ml/min
Heats PRBCs at 10 degrees Celsius up to 50ml/min
You can infuse faster than these rates, but fluid may not be fully warmed
Rechargeable battery; docking station in the nursing office to charge
Instructions for use:

Open heater unit door
2. Line up orientation hub on the disposable set with the notch in the heater unit (red to red)


3. Close door and secure the latch
4. Attach the disposable set to the IV administration set (red capped end, red to blood) and prime as you normally would, then hook up to patient (blue capped end, blue to you)
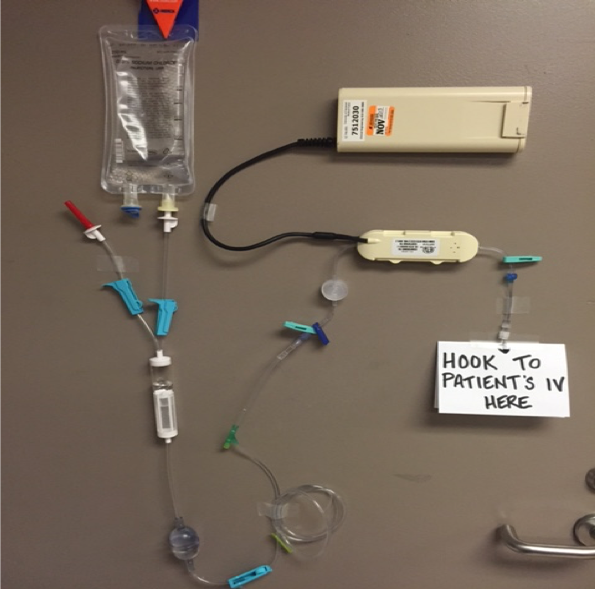
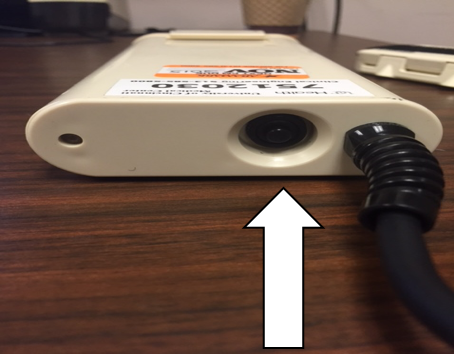
5. Press the “ON” button and begin infusing
6. Don’t forget to watch the battery life…and remove and dock on charger if needed

Blood temperature INdicator
Inactive: before it is applied to blood product bag, indicator should never be yellow

Active: actively monitoring temperature, indicator should always be green

Triggered: blood has gone over acceptable temperature and should NOT be administered

sapphire pump
Set-up and Use:
Obtain Supplies: Sapphire tubing, 60cc luer-lock syringe, 10cc flush, Sapphire pump


2. Flush side port of Sapphire tubing with NS flush then replace sterile cap

3. Draw up medication to infuse in 60cc syringe (draw up entire 60cc or as much of the medication as is available)
4. Ensure there is no air in syringe
5. Remove sterile cap from end of tubing, attach 60cc syringe, and flush entire line
NOTE: must ensure no air in tubing (otherwise pump will alarm and stop infusing)

6. Leave 60cc syringe attached to Sapphire tubing (this is your medication reservoir)
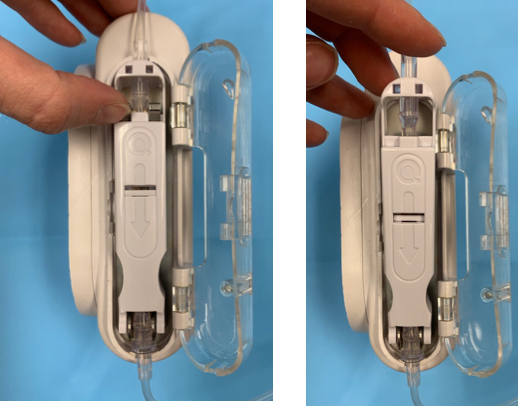
7. Insert tubing into pump:
Open clear plastic cover on Sapphire pump

Arrow on plastic connector points down
Hook plastic ‘feet’ into metal rod

Press plastic firmly to click on place

Close Sapphire pump cover
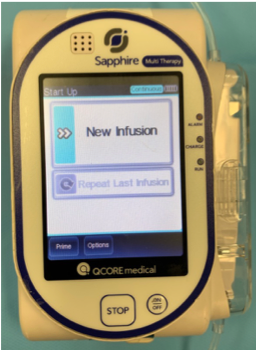
8. Turn on pump and program your drip (example below for esmolol drip)
Select ‘New Infusion’ then ‘Dose Calculation’
NOTE: for any titratable drip ALWAYS select dose calculation, for non-titratable drip (heparin/tPA) you can select ‘mL’ and simply program in the rate (mL/time)

Select medication concentration units then type in concentration


Select ‘Weight-based Infusion’ if applicable then enter patient’s weight


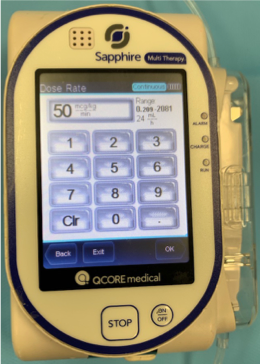
Select units for infusion dose rate, then select ‘Dose Rate’ and enter rate


Select ‘VTBI’ (Volume To Be Infused) and enter total volume of medication drawn up (60mL if syringe was full prior to priming tubing)
Pump then automatically calculates how long you can infuse medication before running out, ‘Time’


Click ‘OK’ and screen will appear with all the settings you have programed in. Show this screen to your partner to confirm that all information entered is correct.
Select ‘OK’ then ‘Start’ and infusion will begin


Select ‘Lock’ to lock the screen (this prevents accidental setting changes from bumping screen during transport)

To unlock screen and change dose in flight, press and hold ‘Press to unlock screen’ then select ‘OK’


9. To remove tubing after use:
Lift up upper metal clip holding plastic tubing connector in place
Plastic connector will pop out and can then be removed
epoc
Labs Provided:
Measured:
Blood Gas: pH, pO2, pCO2, Lactate
Renal: Na, K, Cl, Ca, Cr, Gluc
CBC: Hct
Calculated:
Blood Gas: HCO3, BE
Renal: AG, GFR
CBC: Hb
Storage and Use:
Keep in padded carrying case unless in use
Take out of aircraft between flights to avoid damage from high/low temperatures
Quality control performed every 2 weeks by flight nurse
Charged weekly/as needed
Quick Start:
Power on both screen and base unit
For user, enter 0000 + Employee ID
For password, leave blank
For patient ID, enter aircraft (e.g., AC1)
Allow to calibrate (takes ~ 3 minutes) & draw patient’s blood sample
Insert sample cartridge with blue triangle facing in
Using syringe drop a fraction of a ml (> 0.92) of blood onto sample entry port (sufficient sample when machine beeps + “analyzing sample”)


nebulizer
Aerogen Nebulizer Set-up
Procedure:
Cut inspiratory limb of circuit 6in from ETT
Attach T-Piece/Aerogen adaptor to circuit
Plug in Aerogen controller à USB / AC/DC Adapter
Add neb solution to medication port

Use with Aerosol facemask:
Minimum O2 flow 1L (range: 1-6L adult, 1-2L peds)

Continuous Nebulization:
Draw up medication in Aerogen syringe and prime tubing
Attach tubing to nebulizer (see below)
Run neb per above