Air Care Procedures
Video intubation
Surgical cric
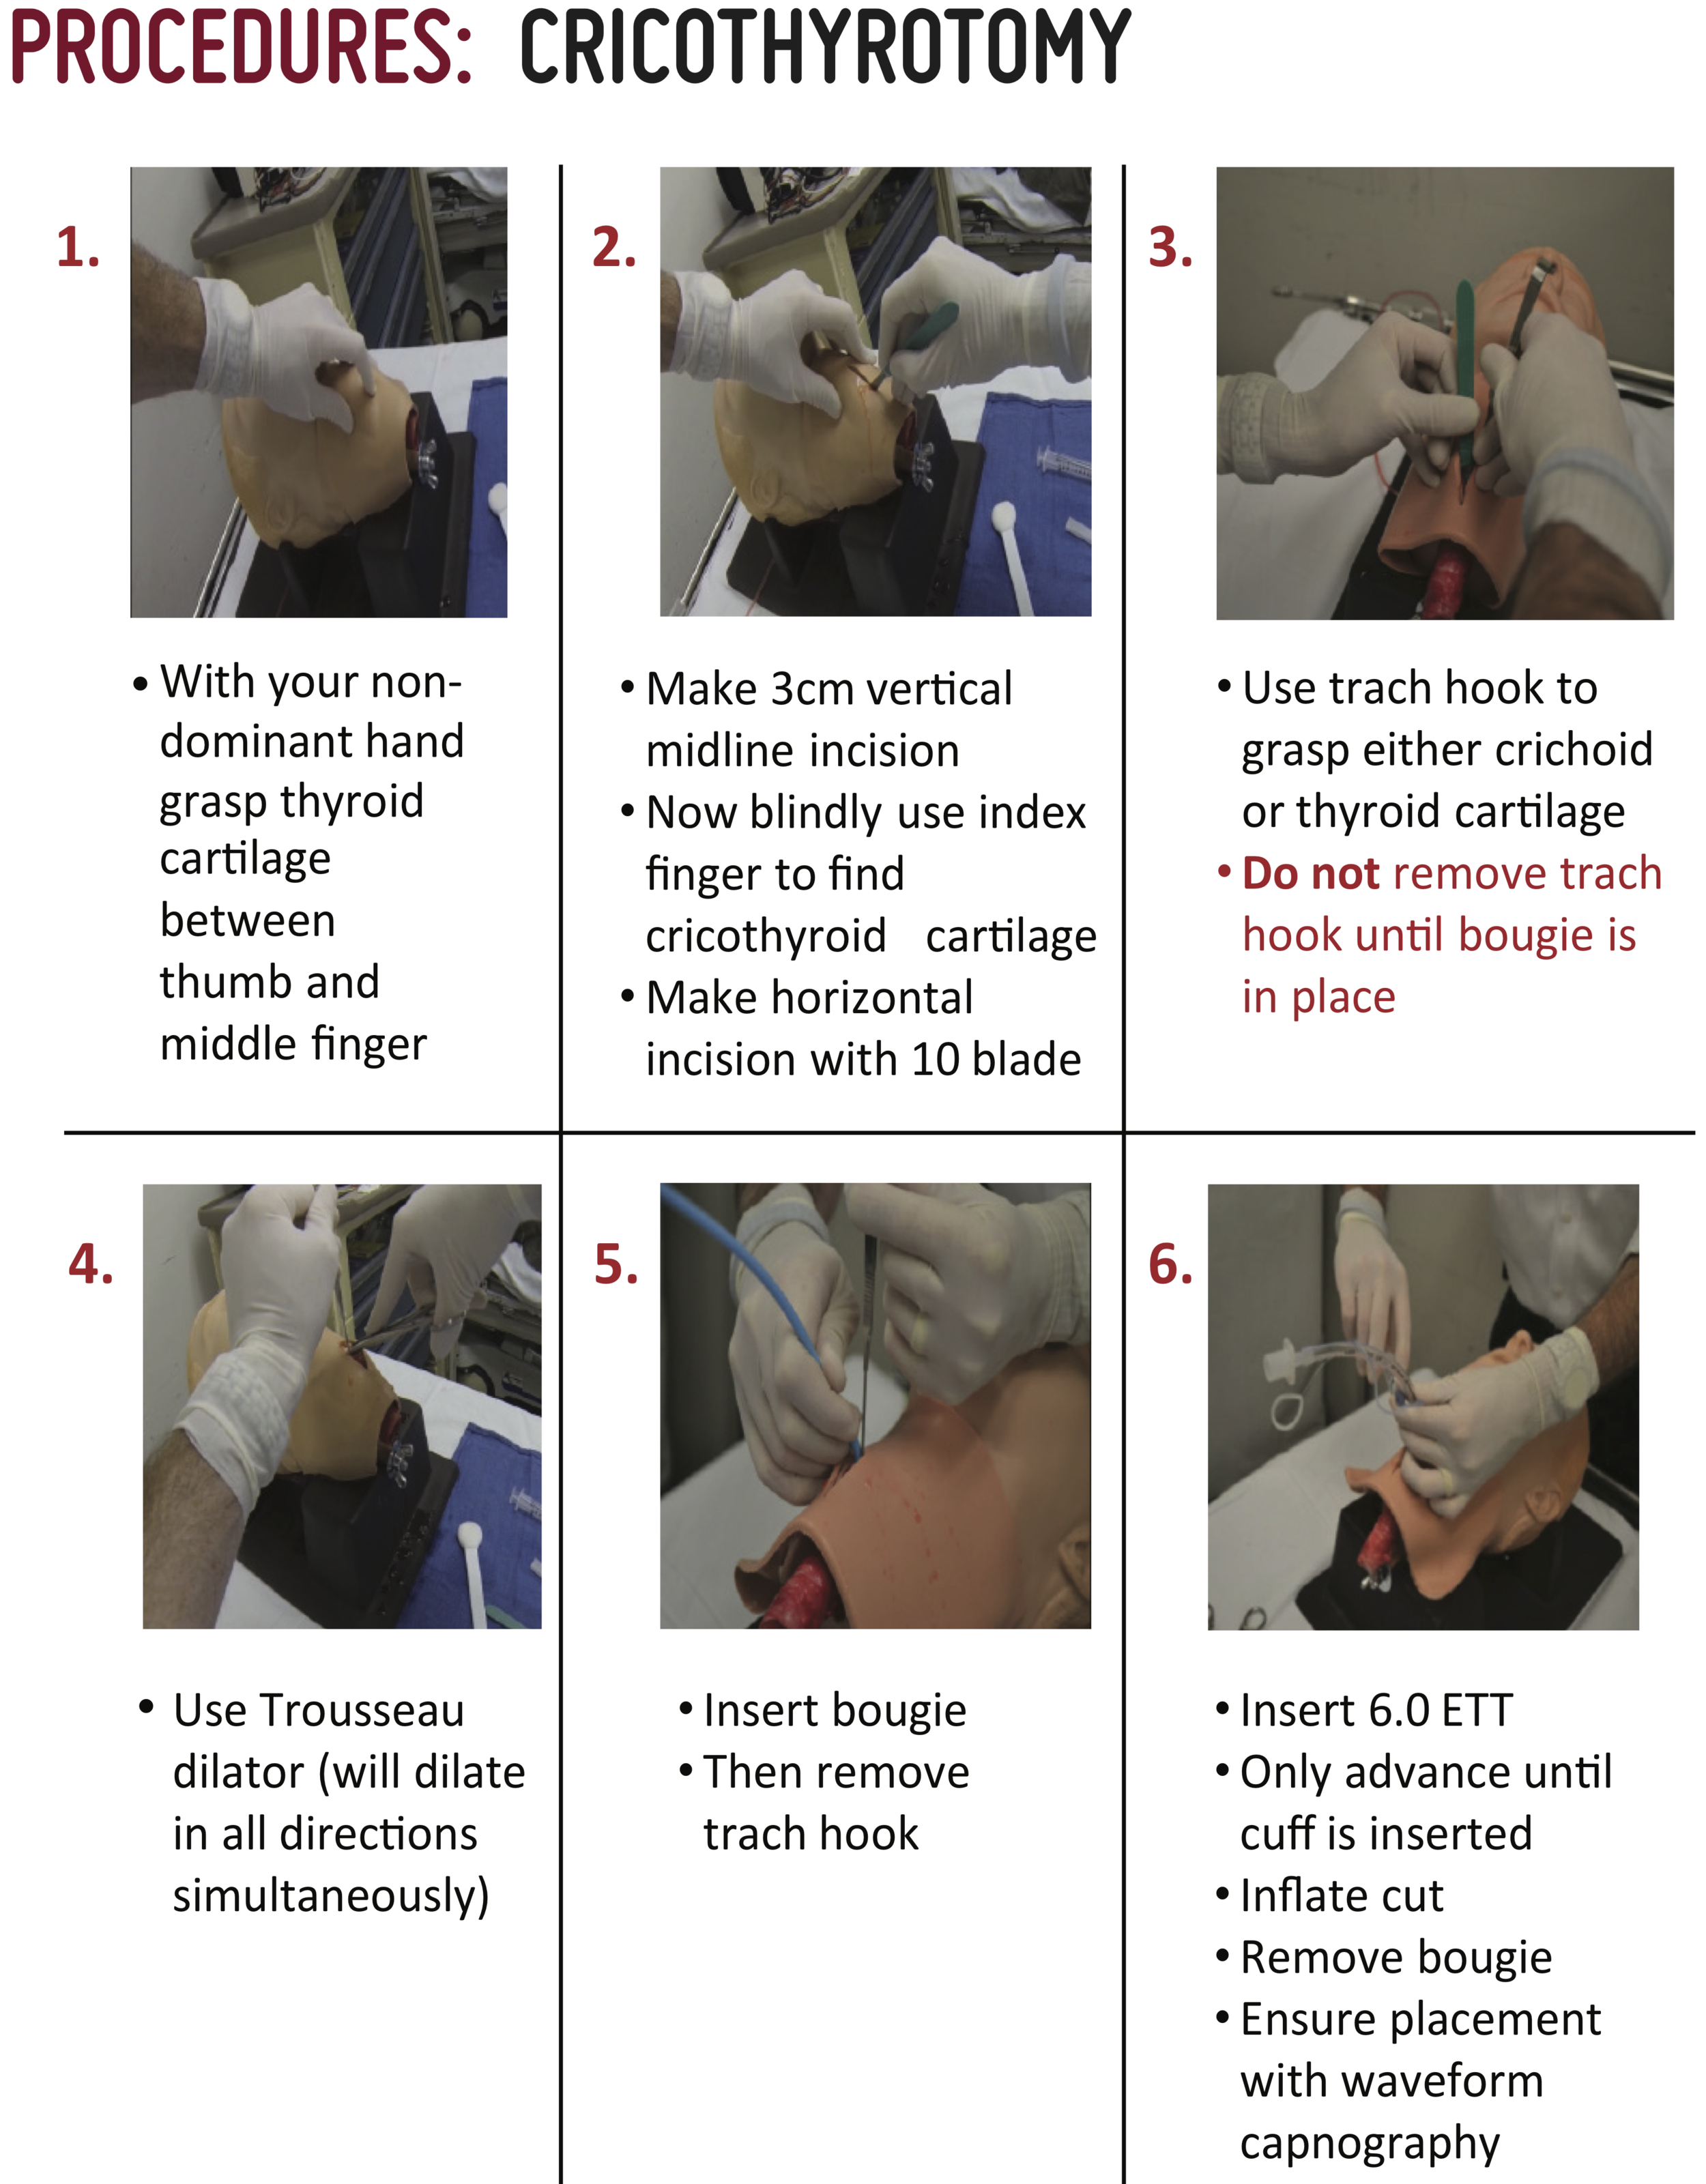
Bougie-aided cric
needle cric

This procedural slide set will show you the step by step process of performing a needle cricothyrotomy
This video shows you, first person, what it is like to perform a needle cricothyrotomy
needle thoracostomy
Indications for Spontaneously breathing patient:
Progressive respiratory distress* with hypoxia
At least 2 clinical indicators of a pneumothorax
Chest wall trauma
Ecchymosis
Crepitus
Deformity
Penetrating injury (gunshot wound, stab wound)
Decreased or absent breath sounds
Jugular venous distension
Tracheal deviation
Ultrasonographic evidence of a pneumothorax
*Please note that the provider must determine progressive respiratory distress clinically. Respiratory distress following major trauma is common and often multifactorial (rib fractures, pulmonary contusion, anxiety, agitation). Tension pneumothorax is a progressive disease process that should worsen with time.
Indications for Intubated patient:
Hypotension** or Shock Index > 1.0
At least 2 clinical indicators of a pneumothorax (see above)
**Tension pneumothorax rarely manifests with hypotension in the spontaneously breathing patient. The intubated patient however will usually develop hypotension.
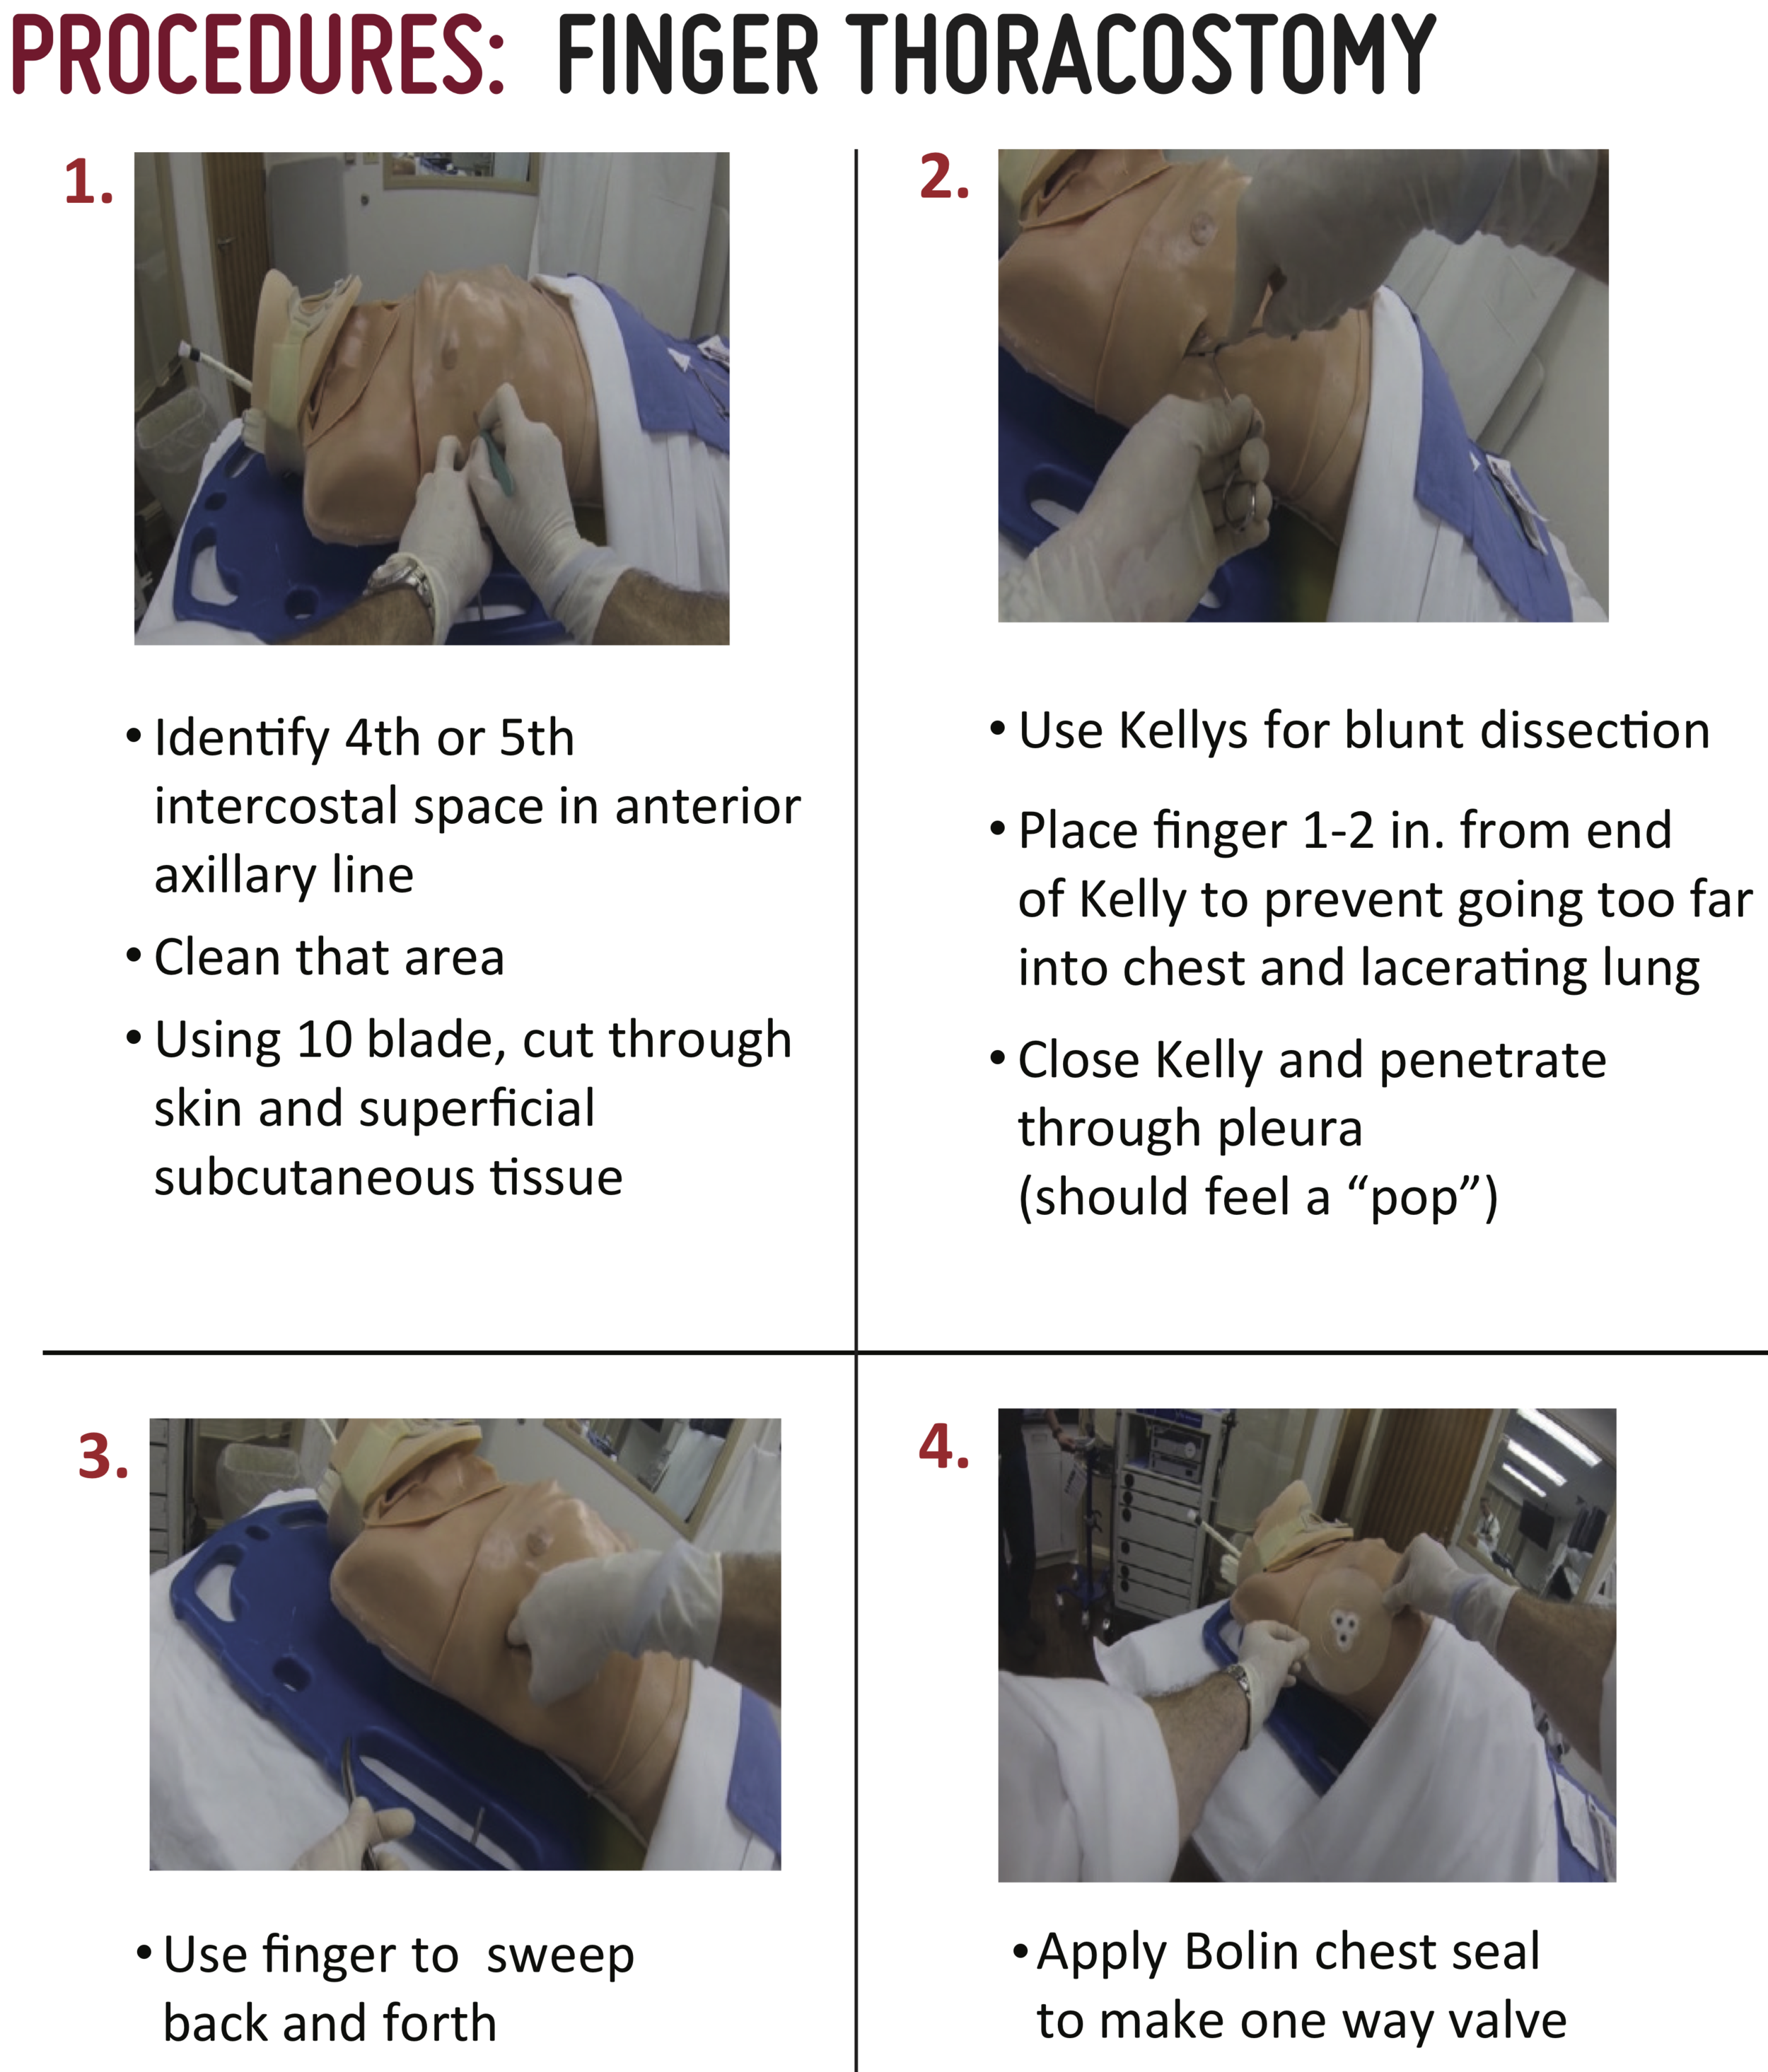
finger thoracostomy
Considerations:
For most patients, needle thoracostomy should be sufficient
Consider Finger thoracostomy for patients with:
refractory pathology
unfavorable body habitus
in cardiac arrest
Provide Ancef if time permits, analgesia, and place chest seal dressing
pericardiocentesis

t-pod
CAT (combat application tourniquet)
EZ-IO
ktd (kendrick traction device)

minnestoa tube
Indications:
Confirmed or suspected variceal upper GI bleed (gastric or esophageal)
AND
Life threatening hemorrhagic shock as evidenced by:
Shock index > 1.3
Significant pressor requirement despite blood product administration
Greater than 8 units of blood products given in 2 hours
Worsening hemodynamic instability and imminent cardiac arrest
Contraindications: Previous gastric bypass (risk of stomach rupture with gastric balloon inflation)
Minnesota Tube Adapter Preparation
Minnesota tube should have inflation adaptors preassembled (Picture 2).
Connect IV caps to three way stop cocks
Connect stop cocks to the balloon inflation ports leaving the balloon inflation side ports occluded with white plastic funnel pieces (Picture 3).

picture 1: Minnesota tube ports Labeled

Picture 2: Minnesota tube with inflation adaptors preassembled

Picture 3: IV caps on three way stop cocks in minnesota tube balloon inflation ports
Minnesota Tube Placement:
Test balloons, inflate underwater to ensure no leaks, fully deflate
Patient should be intubated prior to tube placement, preferably with rocuronium to assist with passage of tube
Insert Minnesota tube like an OG tube to 50 cm
A laryngoscope and McGill forceps may assist with placement
Consider the Eschmann Stylet (aka “Bougie”) assisted method
Inflate 50 mL of air into gastric balloon (Picture 4)
Confirm gastric balloon is below diaphragm on XR

Picture 4: Inflate 50 mL of air into gastric balloon

Picture 5: Inflate gastric balloon fully to a total of 500 mL, clamp balloon port

Picture 9: One Hollister is used for both ETT and Minnesota tube; an additional tube clamp is placed in series next to the ETT clamp.
Gastric Hemorrhage Management:
Inflate gastric balloon fully to a total of 500 mL, clamp balloon port (Picture 5)
Retract tube gently until hold up is felt (usually ~40 cm)
Secure tube with Hollister ETT holder under 1-2 lbs. of tension
Same Hollister is used for both ETT and Minnesota tube; an additional tube clamp is placed in series next to the ETT clamp (Picture 9).
Esophageal Hemorrhage Management:
Aspirate from the esophageal aspiration port (Picture 6)
If blood return, then inflate esophageal balloon to 30 m Hg using cufflator (pressure may vary slightly with ventilator cycles, Picture 7)
Re-aspirate and if continued bleeding then inflate to 45 mmHg, clamp balloon port (Picture 8)
Picture 6: Aspirate from the esophageal aspiration port
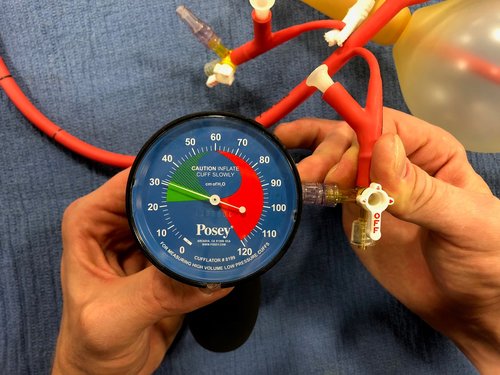
Picture 7: Using Cufflator inflate the esophageal balloon to 30 mmHg

Picture 8: Inflated minnesota Tube
Assessing a Tube Placed by Another Provider:
Identify tube type
Sengstaken-Blakemore tube
250 cc gastric balloon AND esophageal balloon
Single gastric aspiration port
Minnesota tube
500 cc gastric balloon AND esophageal balloon
Gastric aspiration port AND esophageal aspiration port
Linton-Nachlas tube
600 cc gastric balloon
Single gastric aspiration port
MANDATORY recent CXR should be obtained to confirm appropriate placement
MANDATORY cuff pressure on esophageal balloon should be checked
If tube is identified to be incorrectly placed then it should be corrected
Tube should be secured with Hollister ETT holder for transport
Aspirate all blood from the gastric aspiration port, clamp port
Bougie Assisted Minnesota Tube Placement:
A bougie may be used as an adjunct for assistance with placement of the Minnesota tube
Place the straight end of the bougie (not the coude tip) into the most proximal of the three gastric aspiration ports, insert approximately 0.5 cm
The fully assembled apparatus may be inserted as an OG by pushing the bougie intentionally down the esophagus
Once fully inserted to 50 cm inflate gastric balloon with 50 mL of air and verify placement below diaphragm with CXR
Continue inflating gastric balloon to 500
In one swift movement remove the bougie. The inflated Minnesota tube will remain in place. Previous placement of the bougie in the most proximal of the three gastric aspiration holes should prevent folding of the distal Minnesota tube between the inflated gastric balloon and gastric fundus.
lateral canthotomy
Indications:
“Look for proptosis, feel for pressure elevation, evaluate for visual dysfunction.”
2 out of 3 of the following must be present
Proptosis
Elevated IOP (by palpation)
Presence of an APD OR inability to count fingers
Relative Contraindications :
Suspected globe rupture (caution with palpation).
Patient refusal or inability to tolerate procedure due to pain or anxiety.
Other greater life threats (i.e. bigger fish to fry; GCS < 12, hypotension). Do not delay scene time for procedure. May consider doing in flight if time and flight permits
Exam Considerations:
Assessing for proptosis
Caution to not mistake lid edema for proptosis. To assess for true proptosis the lids must be opened. This can be challenging when tight and edematous. This can be accomplished with assistance using 4x4s for traction, paperclips, and looking down on the patient’s face from the head of the bed
Assessing elevated intra-ocular pressure
Gentle palpation of the globe can provide a rough assessment of the intra-ocular pressure. A hard “rock-like” globe is concerning. Avoid palpation if there is concern for globe rupture.
Assessing visual acuity
And APD (afferent pupillary defect) is not equal to a blown pupil. The APD will still react consensually. Gross visual dysfunction will be evidenced by lack of ability to count fingers.

Diagram by Riley Grosso, MD. This work is licensed under a Creative Commons Attribution-NonCommercial-ShareAlike 4.0 International License.
field amputation
Indications
Need for rapid removal of patient from environment due to EITHER life threatening patient medical factors (e.g., patient entrapped in MVC and peri-arrest) OR life threatening environment factors.
AND
Entrapment of a limb amenable to amputation preventing removal of patient from environment.
Contraindications:
Entrapment of limb at a proximal location precluding proper placement of tourniquet to control bleeding.
Environmental factors that would make the procedure unsafe for the provider (e.g., car is on fire).
Considerations:
Call medical control prior to performing
If patient is awake MUST obtain consent
If any awareness present provide analgesia/sedation with ketamine
Procedure:
Place a tourniquet (CAT) as far distal as possible on the affected limb but proximal to the site of planned amputation (record tourniquet time)
Prepare the skin using betadine, chlorhexidine, or alcoho
Utilizing scalpel, make a circumferential skin incision at most distal point on the entrapped limb
Incise through all of the soft tissue, down to bone
Place Gigli saw around exposed bone and while holding a handle in each hand, perform slow back and forth motion while pulling tension on both ends of the saw in a “V” shape of roughly 90 degrees
Cut completely through the bone
Obtain hemostasis with direct pressure, application of a second tourniquet, and/or selective clamping of vessels
Utilize bone wax if necessary to control bleeding from freshly cut bone
Place sterile gauze over the end of limb and cover with an ace bandage
If able to retrieve limb after amputation, place in hazardous materials bag and transport with patient
chest wall escharotomy
Indications:
Chest wall full thickness burns hindering respiratory mechanics with imminent threat to life as evidenced by at-least one clinical indicator AND at-least one objective indicator.
Clinical Indicators:
Patient feels hard to ventilate with BVM
Lack of visible chest rise
Objective Indicators:
High pressures on BVM (>40 mmHg) despite removal of other potential obstructive hindrances (pneumothorax, obstructed ETT, right mainstem intubation).
High peak pressures on ventilator (>40 mmHg) with low tidal volumes without other more probable cause (Asthma/COPD, ARDS, vent dysynchrony).
Hypoxia (SpO2 < 90%) refractory to endotracheal intubation and not felt to be secondary to hypotension or another reversible etiology, e.g., a tension pneumothorax.
Persistently elevated EtCO2 (>60) despite adequate respiratory rate and tidal volumes.
Blood gas with evidence of significant respiratory acidosis despite adequate respiratory rate and tidal volumes (pH < 7.2, pCO2 > 60).
Chest wall full thickness burns hindering BVM ventilation in a patient in full cardiac arrest undergoing CPR prior to termination of resuscitative efforts.
Relative Contraindications:
Burns that are obviously non-compatible with life, i.e., burned beyond recognition
Other greater threats to life needing assessment
Procedure should not be done in flight
Procedure:

picture 1. Incision sites for chest wall escharotomy
Ensure patient has adequate analgesia and anxiolysis
Outline the incision sites with marking pen (picture 1)
bilateral anterior axillary lines
elliptical incision inferior to the costal margin joining the vertical incisions
Avoid any incision below the clavicles
Prep incision sites with chlorhexidine
Incise with #10 blade through eschars until subcutaneous fat is visible
bleeding is normal and indicative of adequate release
Avoid cutting through fascia.
Run finger along incisions to break up fibrous bands
Obtain hemostasis prior to transport
Pressure and gauze
Portable electrocautery device
Place saline soaked kerlix in incision
Considerations:
Strongly consider contacting medical control prior to performing
Ensure hemostasis post-procedure
Dress incision with saline soaked gauze/kerlix
resuscitative hysterotomy
Indications:
Pregnant female > 24 weeks gestation (fundus at umbilicus)
AND
Cardiac Arrest < 15-20 minutes
Best outcomes if done within 5 minutes
Use crew judgment for 15-20 minutes
Strongly consider if any signs of life present
Spontaneous movements or breathing
Pupillary or gag reflexes present
PEA on monitor
Procedure:
Large midline vertical incision from the umbilicus to the pubic symphysis (video 1). Cut through all layers of the abdominal wall. If apparent, use linea alba as a guide (video 2).
Expose the anterior surface of the uterus. Move the bladder inferiorly. Try to avoid it, but do not waste excessive time retracting the bladder or catheterizing the patient.
Make vertical incision through the lower uterine segment of the uterus until amniotic fluid is expressed (video 3). Insert index and long fingers into the defect lifting the uterus away from the fetus. Use scissors to extend the incision to the fundus
Video 1. Midline skin incision
video 2. use linea alba as a guide
Video 3. vertical incision through uterus
Deliver infant (video 4). Apply pressure to the external part of the uterus to help deliver infant.
Clamp and cut the cord. Then hand the infant off to an alternate provider for ongoing newborn resuscitation (video 5).
Deliver the placenta (video 6).
Pack the abdomen (video 7).
Give oxytocin when available.
Video 4. deliver infant
video 6. deliver (remove) placenta
Video 5. clamp and cut cord
video 7. pack the abdomen
Considerations:
Call medical control prior to performing
As soon as loss of pulses noted, procedure should be started
Crew resource management
If suspected sick mom then place 2nd helicopter on stand by
If no pulse then doc starts procedure, medic/nurse starts compressions
Nurse or Medic secures airway: iGel or ETT
Nurse prepares for newborn resuscitation, 2nd team en route