Mastering Minor Care: Slit Lamp Exam
/Have you heard that eyes are the window to the soul? Well, the slit lamp is the window to the eyes! Does even the word “slit lamp” make you cower in fear of this clunky machine hiding somewhere in the emergency department? Have no fear! After this illustrated guide, even the novice EM provider can feel more comfortable breaking this machine out to help work-up all your eye-ball related complaints!
When Do I Use it?
Great question! The slit lamp exam is useful in any situation where magnification may be helpful to identify pathology of the anterior portion of the eye. This includes insult to the lids, lashes, conjunctiva, cornea, anterior chamber, iris, and lens.
It may be a part of your complete workup of the eye, such as evaluation for painful red eye, that also includes tonometry, fundoscopy, visual acuity and fluorescein evaluation. It can also be used to facilitate ocular foreign body removal.
Getting Started
You need some materials before you get started. You should gather these before you get your machine, so you don’t have to leave the room multiple times. You’ll need:
Fluorescein strip
Saline drops (or tetracaine, if also planning tonometry or patient is in pain)
Alcohol pads
Cotton swabs
Gloves
You should also tell the patient to remove their contacts if present. The fluorescein will cause stains.
Basic Anatomy of the Slit Lamp
This can be done by identifying the important parts of the lamp, like the oculars, light source, and magnification panel (image 1). However, it’s also important to know that there are 4 basic sections of the machine that act together to function: the viewing arm, illumination arm, patient positioning frame and base (image 2) [1]. If you are new to the slit lamp, or are getting used to a new machine, it may be helpful to go through the set-up BEFORE you get into the patient’s room.

IMAGe 1.

Image 2.
Starting: Step by step
1. Clean it!
No brainer. Wipe down the parts of the machine the patient will touch (chin rest and head strap)
2. Turn it on!

Image 3.
Sounds easy? It might be harder than you think. Make sure the machine is plugged in and then flip the ‘on’ switch and make it turn green (image 3).
3. Positioning
First, make sure both you and the patient are at comfortable seating levels.
Adjusting the table: Move the height of the table by using the lever on the bottom of the base table. Patient should be able to comfortably rest their chin on the chin rest by simply leaning forward (images 4, 5).
Adjusting the headrest: There are black markers on the vertical poles of the headrest. These should be aligned with the patient’s lateral canthus (figure 6). To adjust the height, twist the knob just below the chin rest (image 6, 7).
Position yourself: Place your stool so you can comfortably look in the oculars then adjust the oculars to your own interpupillary distance. If you wear contacts or corrective lenses, twist the eyepieces until they are set at 0, otherwise set for your own prescription.

image 5.

Image 6.
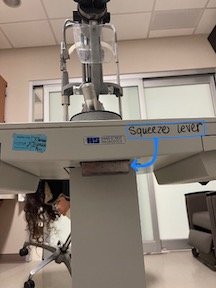
Image 4.

Image 7.
4. Adjusting beam dimensions
The slit lamp beam light can be adjusted to be wider or narrower, as well as taller or shorter
Vertical: To adjust the vertical dimensions of the light beam, twist the knob that is located under the light filter tray (image 8, 9).

Image 8.
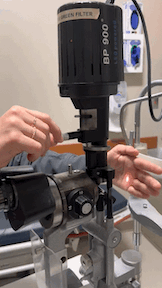
Image 9.
Horizontal: To adjust the horizonal dimensions of the light beam, twist the knob that is located at the base of the swinging arm of the slit lamp. Broadening of the beam helps to illuminate more of the eye during examination while narrowing the beam is good for patient comfort and examining the depth of structures, like the anterior chamber (image 10, 11).

IMage 10.

image 11.
5. Moving the beam and focusing your image

Image 12.
First, it is important to unlock the base so that it can move freely. You should twist the locking mechanism located on the table base (image 12). This is good to keep locked while you are moving the slit lamp from room to room but needs to be released for the exam.
Forward/Backward/Side to side: To move the beam closer or further from the patient, you can use the joystick on the base or the base itself. For gross movements, use the base. For finer movements, toggle the joystick in the direction you want the slit lamp to move (image 13).
You should be looking through the microscope when maneuvering the joystick
Up and down: Twist the joystick clockwise and counterclockwise. This allows the beam of light to assess different areas of the eyes (image 14).
Magnification: Located just in front of the eye piece is a knob that adjusts the magnification of the lens. You should start at a lower magnification initially, increasing as necessary for optimal visualization (image 15).

Image 13.

Image 14.

image 15.
Next Step: Evaluate the Eye
Now it’s time for the most important part, getting a good look at that bag of goo we call our eyeballs! Like many parts of emergency medicine, it’s good to form a practice pattern and perform the exam systematically, to make sure there isn’t any aspect you are forgetting.
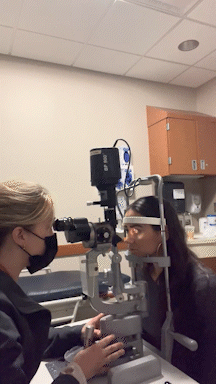
image 16.
Start by using the lowest magnification and the highest and widest light dimension that the patient can tolerate.
The light source and microscope are located on separate swivel arms. Swing only the light source arm to about 45 degrees of the temporal side of the eye. Have the patient focus on a target so their eyes remain still.
Move the base and light beam forward until you are focused on the patient. Pro tip: choose a spot that is not their eyeball for focusing. This decreases patient discomfort. The bridge of the nose is a good location to start.
Sweep across the upper lid, twist the joystick to lower the beam, then sweep backward across the lower lid.
Now, examine the cornea, looking for irregularities. You should also notice the presence or absence of ciliary flush at this time
Next, examine the anterior chamber. In the ED, this is mainly done to assess for cells and flare. Normally, the anterior chamber is clear and dark. Tiny, reflective flecks between the cornea and the iris are termed cells. The surrounding haze is flare.
Finally, assess for defects of the cornea. This involves the use of fluorescein, which stains the cornea anytime the epithelium is compromised.
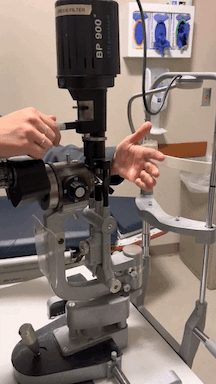
image 17.
Instilling the fluorescein
Have the patient lie back. Moisten the fluorescein with a drop of saline (or tetracaine if assessing tonometry or patient is in discomfort). Pull down the patient’s lower lid and lightly touch the moistened tip of the fluorescein strip to the palpebral conjunctiva of the lower lid. Have the patient blink several times to distribute the stain
Cobalt blue light
After instilling the fluorescein, you will want to change your light source to cobalt blue. To achieve this, rotate the vertical light beam adjustment knob clockwise and go to the final setting (image 18).
EXAM
Using a similar technique, scan over the entirety of the cornea, looking for areas of florescent green uptake. To look at the entirety of the cornea, use a cotton swab to retract the patient’s eyelids. Place at the top of the eyelid and twist, pulling the eyelid upwards. You can do the same with the lower lid. While looking for abrasions, be on the lookout for a positive Seidel’s test, where leakage of aqueous humor from the anterior chamber causes dilution and running of the fluorescein dye.
Documentation Pearls
While the most important part of this exam is getting a good look in the eye to determine pathology, it’s important that your hard work is documented appropriately in the EMR.
While this post goes over the appropriate usage of a slit lamp exam, it’s important to remember that you will be doing much more than this to evaluate an eye complaint in the ED. Your evaluation should also include inspection of surrounding structures, extraocular movements, pupillary reaction, visual fields, visual acuity, tonometry and a fundoscopic exam.
A normal eye exam is documented as follows…
Visual acuity 20/20 OD, 20/20 OS, 20/20 OU
Visual fields intact to confrontation.
External exam revealed no surrounding soft tissue edema, no surrounding erythema, upper and lower sulcus free of foreign body with eversion of the eyelids, conjugate gaze.
Sclera unremarkable
Extraocular movements were intact and were free of pain or nystagmus
PERRL 4mm --> 2mm. No relative afferent pupillary defect.
Pressure by tonopen 10 left eye, 10 right eye
Slit-lamp exam without additional findings in lids/lashes or sclera/conjunctiva. There was no flare or cells, no corneal abrasions or ulcerations, no Seidel's test.
Funduscopic exam without papilledema or abnormal vascular markings
Okay, let’s wrap this up!
Some pointers to remember as you’re evaluating eye complaints in the Emergency Department.
Don’t be afraid of the slit lamp!
It’s an incredible tool that helps us quickly evaluate a myriad of eye complaints. So pick-up all the eyeball complaints on the track board and get comfortable using this machine!
Setup is key!
It’s always a good idea to familiarize yourself with your machine and all the associated buttons and knobs before entering the patient’s room, particularly if it has been some time since you have performed this exam. Make sure the machine is clean and you are ready to go!
Be systematic in your approach!
Doing the exam the same way every time will increase your comfort with the machine and decrease the likelihood that you may miss an crucial finding. Find the approach that works for you and stick with it!
Post by Olivia gobble, MD
Dr. Gobble is a PGY-1 in Emergency Medicine at the University of Cincinnati
Editing by Bronwyn Finney, MD & Bennett Lane, MD & JAMEs li, md
Dr. Finney is a PGY-2 in Emergency Medicine at the University of Cincinnati. Dr. Lane is an Assistant Professor in Emergency Medicine at the University of Cincinnati. Dr. Li is an EMS Fellow in Emergency Medicine at the University of Cincinnati
References
Back to basics: The Slit Lamp Exam: EM Daily. Back to Basics: The Slit Lamp Exam | EM Daily. https://emdaily.cooperhealth.org/content/back-basics-slit-lamp-exam. Accessed April 5, 2022.
ALiEM Educational Videos; 2011. https://www.youtube.com/watch?v=g0qqwJIKQlY. Accessed April 5, 2022.
Pickens A. Slit lamp anatomy. EM in 5. https://emin5.com/2016/02/07/slit-lamp-anatomy/. Published December 7, 2017. Accessed April 5, 2022.
Slit lamp examination. EyeWiki. https://eyewiki.aao.org/Slit_Lamp_Examination. Published May 27, 2020. Accessed April 5, 2022.