
FAST and eFAST ULTRASOUND
(Focused Assessment with Sonography for Trauma)
TL;DR? Click for Minimum Diagnostic image requirements
Objective:
Detection of intraperitoneal, intrathoracic or pericardial blood in the setting of trauma. The eFAST exam also includes lung evaluation to assess for pneumothorax.
INDICATIONS
Blunt Abdominal Trauma: This is the primary and historical indication for FAST. In cases of blunt abdominal trauma, FAST is used to determine the presence of intraperitoneal hemorrhage in unstable patient, thus determining need for emergent laparotomy. This has now essentially replaced the role of DPL in evaluation of the trauma patient. FAST can also be used in the stable patient although it is of less predictive utility in assessing need for surgical intervention.
In select circumstances, DPL can still be valuable in evaluating fluid (such as ascites) vs. bleeding in the peritoneum
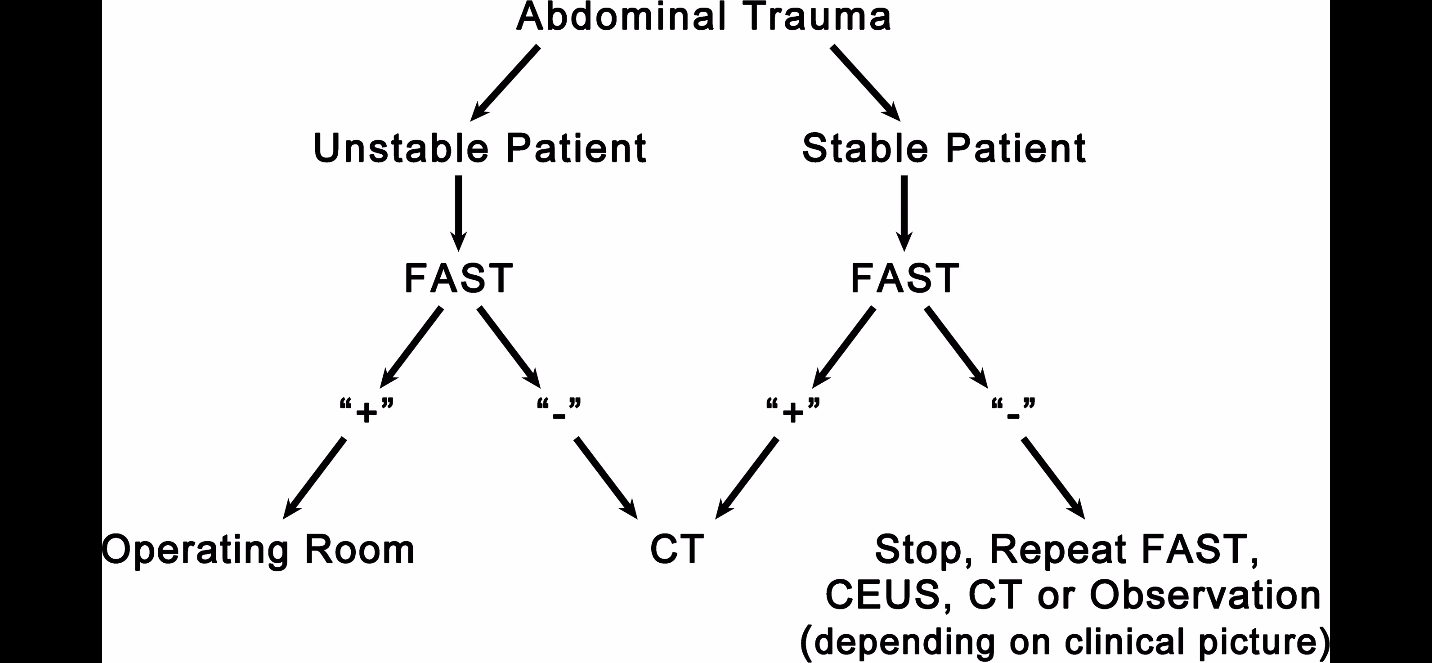
Keep in mind, individual institutional algorithms may vary.
An example of a standard algorithm when FAST was first adopted:
Expanded Indications:
Blunt thoracic trauma and Penetrating thoracic trauma: Similar to above, primarily for assessment of pericardial effusion/hemopericardium with the additional benefit of eFAST to assess for pneumothorax and hemothorax
Penetrating abdominal trauma: FAST has less of a role, given the incidence of bowel and other intra-abdominal injury not detected by ultrasound. Overall, this is generally better evaluated by CT, however ultrasound can be helpful in initial bedside evaluation and aid in prioritization of further therapy/diagnostics
An example of a more modern strategy for utilization of FAST in trauma:
Radiology 283.1 (2017): 30-48.
THE ANATOMY
Peritoneal Cavity:
The FAST exam takes advantage of so-called ‘dependent positions’ in the peritoneal cavity in the supine patient. These positions refer to the areas for preferential free fluid accumulation in the abdomen. Similarly, the exam focuses on areas of potential interfaces between solid organs in order to improve visualization of fluid. The dependent areas are namely the left and right paracolic gutters.

By Henry Vandyke Carter - Henry Gray (1918) Anatomy of the Human Body Bartleby.com: Gray's Anatomy, Plate 1040, Public Domain
Notably, the right paracolic gutter is deeper and less obstructed than the left, as such, fluid generally tends to flow towards the right paracolic gutter. These gutters flow towards potential spaces (described below) in the abdomen. The FAST focuses on these as areas of evaluation.
RUQ
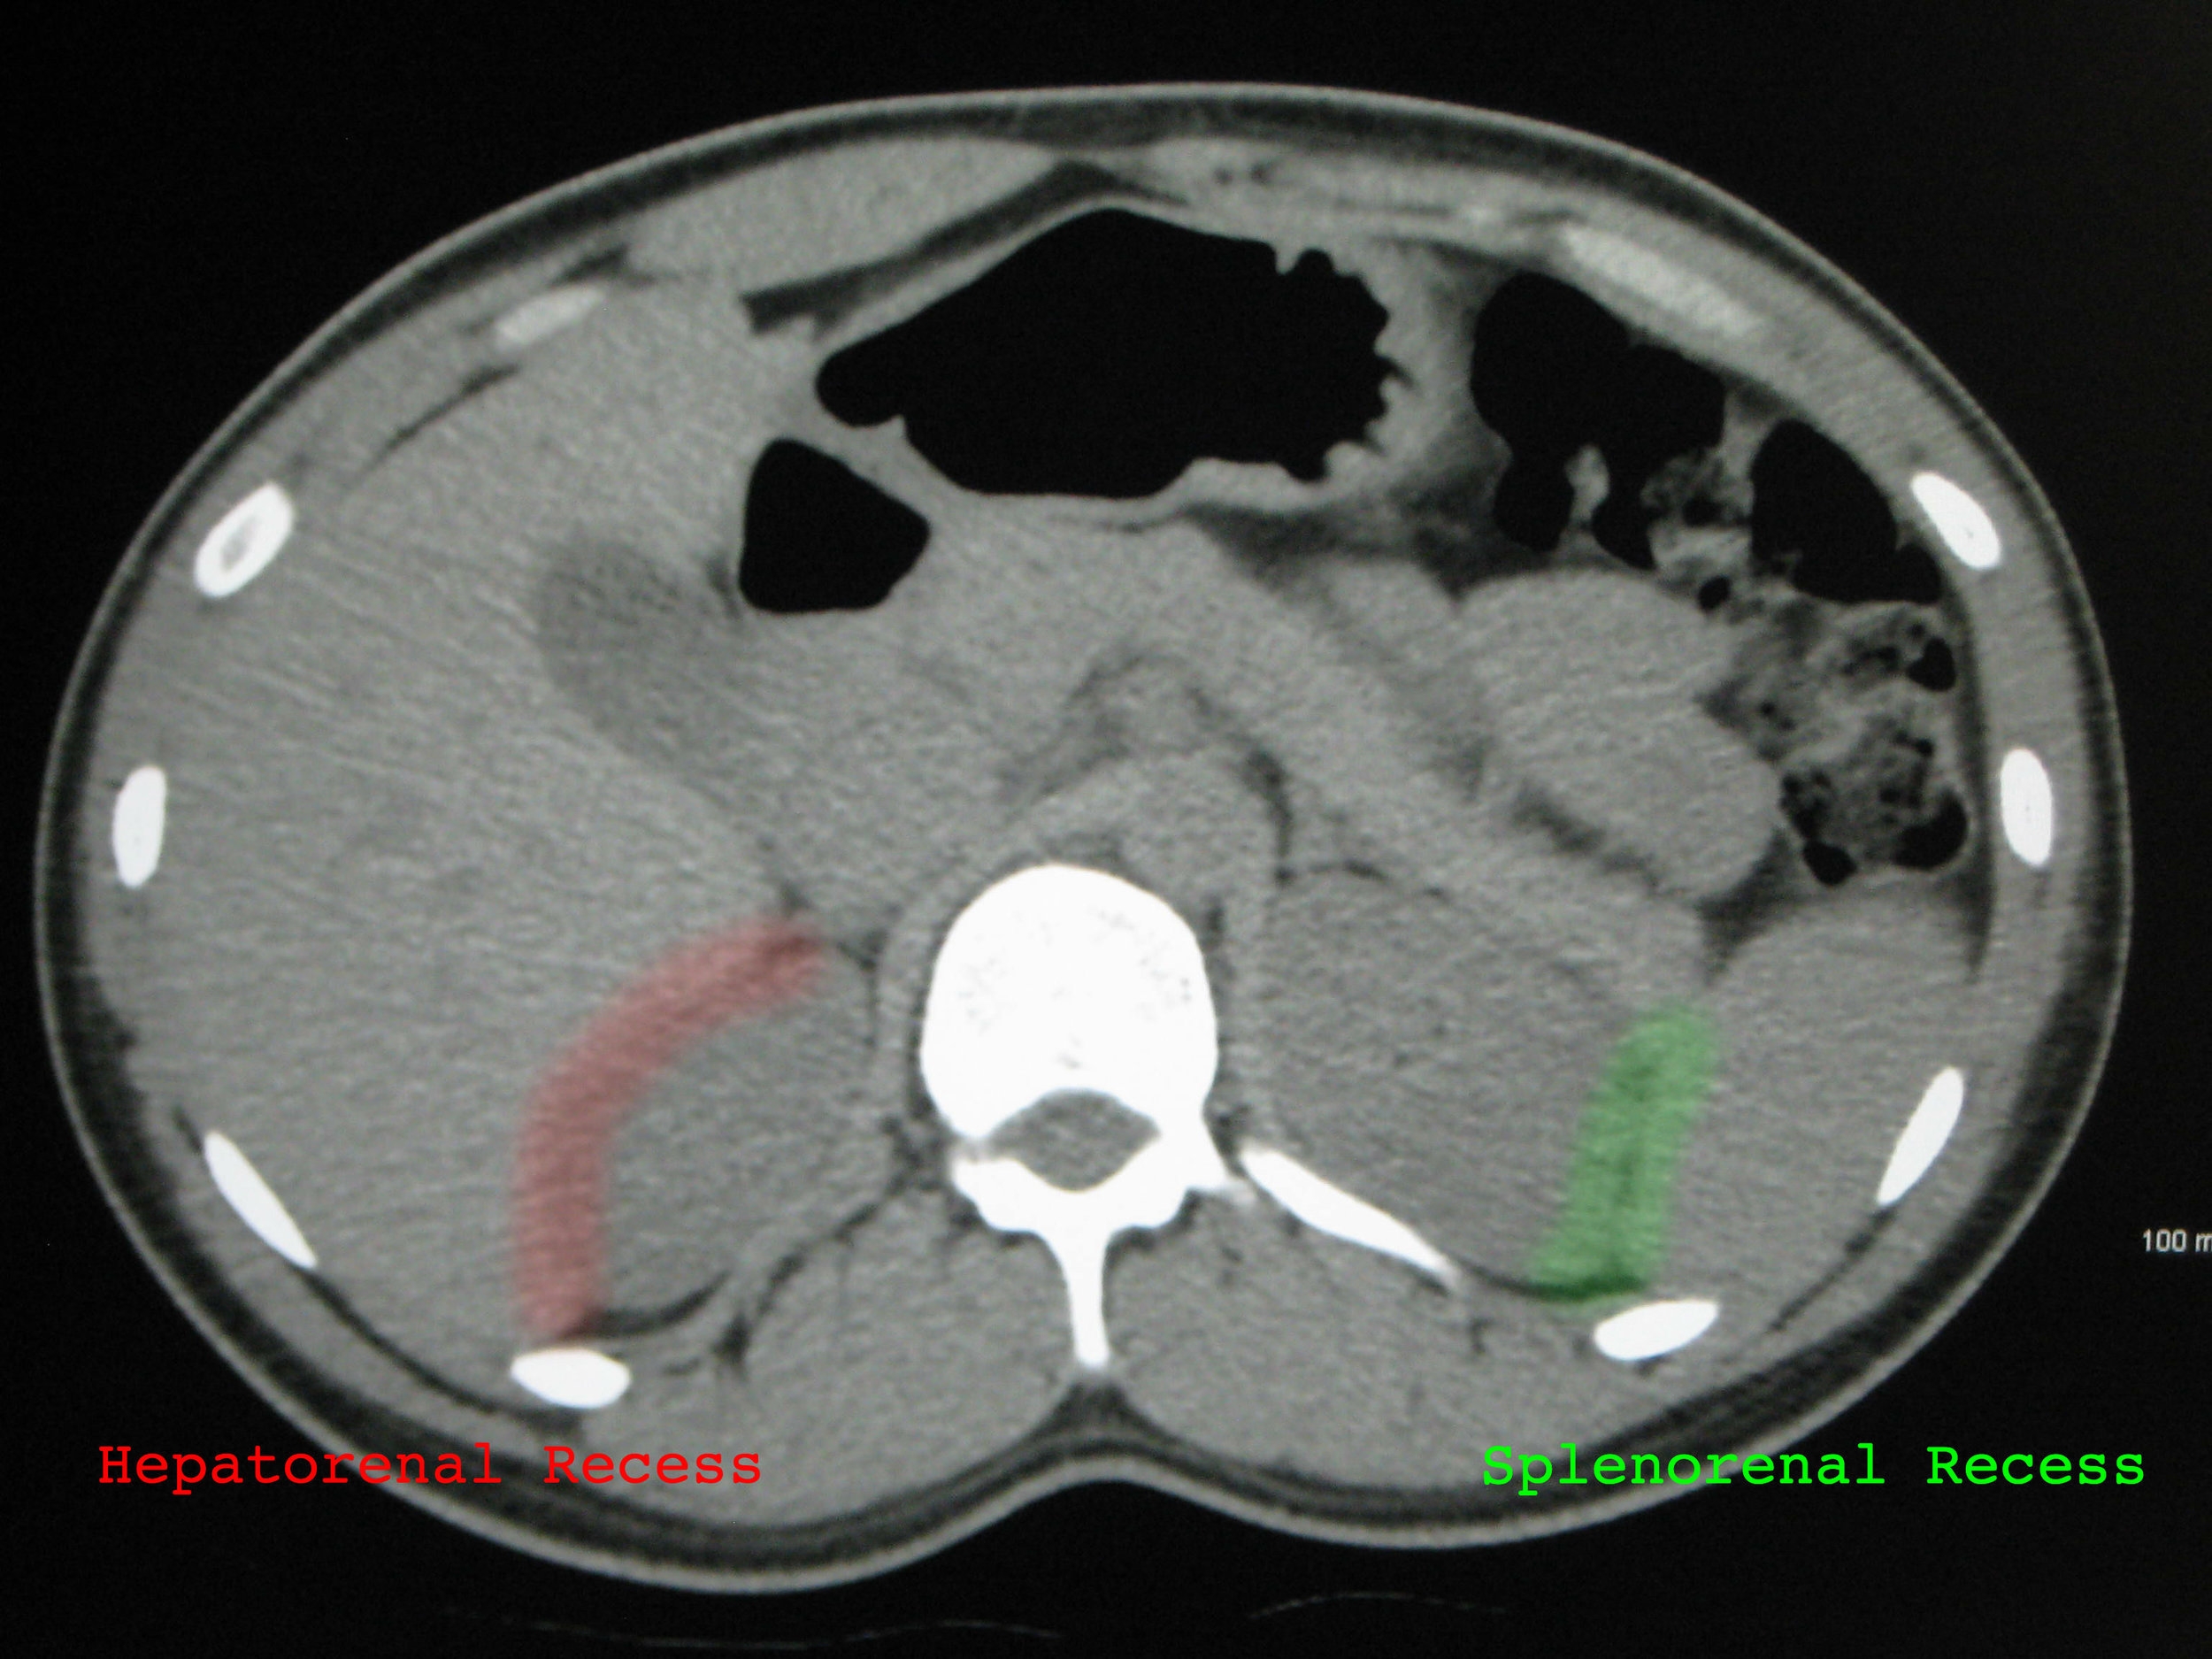
Morisons Pouch or Hepatorenal recess: Located in the RUQ between the capsule of the liver and Gerota’s fascia of the kidney
In a normal patient, this interface should appear as a hyperechoic line (representing the abutting fascia layers)
Also visible in the RUQ is the right superior paracolic gutter. This is often described as an area adjacent to the inferior edge of the liver. This is generally the most dependent area in the abdomen, and thus the most sensitive location for assessing free fluid. It has been shown that this view can detect as little as 200 mL of free fluid in the abdomen. As such, it should always be included in the FAST examination for it to be considered adequate.
LUQ
Splenorenal recess: Located in the LUQ between the spleen and Gerota’s fascia of the kidney
This area is identified by the hyperechoic diaphragmatic line, and the mixed echogenicity of the spleen and kidney, also separated by the hyperechoic fascial line.
Importantly, while fluid can collect in the subdiaphragmatic area in the RUQ, this is more common in the LUQ. Fluid in the LUQ more commonly tends to collect between the spleen and the diaphragm, as opposed to collecting in the splenorenal recess. This is due to position of the splenocolic ligament, which can block blood from travelling down the left paracolic gutter, as well as tendency for bleeding in the LUQ to originate from the splenic vasculature in blunt trauma.
Pelvis
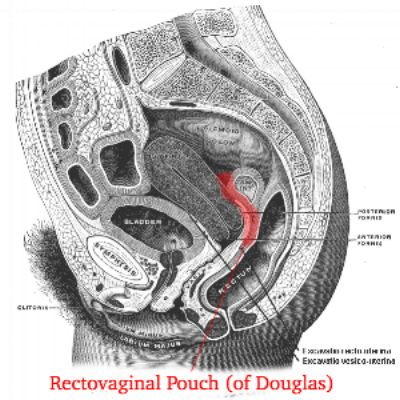
Inframesocolic compartment AKA Rectovesical pouch in males or Rectouterine pouch (of Douglas) in females
Potential space formed by the reflection of the peritoneum from the rectum to the bladder (or uterus in females). Fluid tends to flow into this area via the right and left paracolic gutters which run from this area in the pelvis into the abdomen, originating in Morison’s pouch and splenorenal recess, respectively.

FAST EXAM DEMO ON ED MACHINES
THE eFAST EXAM
Probe selection:
The probe of choice is a phased array probe, as it can achieve adequate penetration while obtaining intercostal windows. If present, a curvilinear probe can also be used for the abdominal portion of the exam. The operator may choose to switch to a linear or high frequency probe for the assessment of pneumothorax in certain cases as it often provides better visualization of the pleural line.


The views:
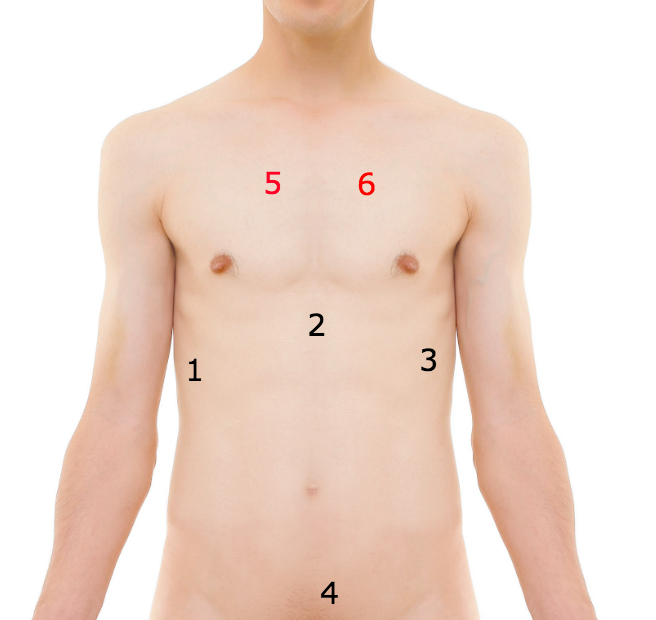
The following views make up the FAST exam (eFAST views in parentheses).
RUQ: hepatorenal space, subdiaphragmatic space, right paracolic gutter/inferior edge of the liver, right thoracic cavity
Cardiac, either subxiphoid or parasternal
LUQ: splenorenal space, subdiaphragmatic space, left paracolic gutter, left thoracic cavity
Pelvic view: (long and short axis) rectovesical in males or rectouterine pouch in female, space lateral to bladder
(eFAST Thoracic view, bilateral anterior chest)
The order in which these views are obtained is provider and situation dependent.
A general guide is as follows:
Isolated abdominal trauma: begin with RUQ, complete remainder of abdominal views first
Penetrating Trauma: begin with cardiac views, progress based on patient symptoms
Respiratory Distress: begin with thoracic views, progress to cardiac and abdominal views
Techniques:
RUQ
Orient the probe in the longitudinal plane with the indicator facing towards the patient's head.
Choose an area between the 8-11th intercostal space in the mid axillary line to begin scanning.
Attempt to first obtain a view of the liver with diaphragmatic line visible towards the left of the screen, then slowly adjust by sliding or angling the probe caudad until the right kidney comes into view.
Fan anterior to posterior to obtain a complete view of Morisons pouch, taking care to visualize interface of the inferior tip of the liver and lower pole of the kidney as this is the most sensitive location for free fluid in this view. This may require fanning at multiple levels in order to obtain a complete image. A positive scan would appear as a dark stripe of fluid between the liver and kidney
To extend intrathoracic portion of view for eFAST, slide the probe cephalad to again visualize diaphragm, now keeping the diaphragmatic line towards the center of the screen. The left portion of the screen will correspond to the thorax, and the right to the abdomen. In a normal patient, there should be a mirror image artifact in the thorax. The presence of intrathoracic fluid will appear as an anechoic area directly above the diaphragmatic line. One may also see a 'spine sign' in this case, which is visualization of the spinal column posterior to the thoracic cavity, due to fluid enhancement of these posterior structures.
Normal RUQ view
Positive intraperitoneal fluid RUQ view
Extending RUQ view to include thorax
(note mirror image artifact of liver into thorax)
Positive R hemothorax
(note absence of mirror artifact in thorax, presence of hypoechoic fluid, and + 'spine sign')
Cardiac
There are two views of choice when looking for a pericardial fluid collection- Subxiphoid or Parasternal Long
Subxiphoid is the best choice, however may be difficult to obtain in some patients (obese, distended abdomen, or abdominal pain). If unable to obtain an adequate view, parasternal long should be the 2nd option.
Subxiphoid
Identify the patient's xiphoid process. Place the probe down transversely, in the patient's right xiphosternal notch, with the indicator facing towards the patient’s right. (remember to hold the probe overhand for this view as it is necessary to obtain the appropriate angle)
Aim the probe between the patient's head and left shoulder. You will need to flatten the angle of the probe to the skin, and apply gentle pressure downwards such that the probe handle is laying on the patient.
Search for cardiac image by fanning in the anterior/posterior plane and adjusting angle towards and away from the left shoulder
You should see an image of liver in the near field of the image, with subxiphoid view of the heart in the far field. Separating them should be the hyperechoic line formed by the pericardium and liver capsule. Note that you will likely need to increase the depth to obtain an adequate image in this view.
Assess for hemopericardium, which will appear as rim of anechoic fluid surrounding the heart, most apparent in the space between liver and pericardium.
Do not confuse a pericardial fat pad with fluid! Although there are exceptions, in general, these rules are helpful in distinguishing the two
Fat pad= internal echoes, anterior, does not change size or shape with cardiac cycle.
Effusion= anechoic, may change shape or location with cardiac cycle and patient positioning.
When in doubt, you should always obtain additional cardiac views!
Normal subxiphoid cardiac view
Parasternal Long
Positive pericardial fluid subxiphoid cardiac view
Place the probe at the 3rd or 4th intercostal space, just lateral to the left sternal border. Orient the probe such at the indicator is pointing towards the patient’s left hip (this assumes the machine is in abdominal mode- if in cardiac mode, rotate the probe orientation 180°)
Rotate the probe on its axis until you are able to obtain an imaging window through the intercostal space rib shadows. Then fan the probe superior to inferior to obtain a view of the heart
If unsuccessful, proceed systematically by searching the 3-5 intercostal spaces in a similar fashion. Side the probe inferiorly to each next intercostal space. If still unsuccessful, slide laterally along each intercostal space until an appropriate image is found.
An adequate view will contain the mitral valve, aortic valve, and cardiac apex, with RV in the near field and LV in the far field.
Look for a pericardial effusion posterior to the heart, which will appear as an anechoic stripe in the far field, just adjacent to the LV.
It can be confusing to differentiate pleural from pericardial fluid in this view. Fluid which is pericardial should pass anterior to the descending thoracic aorta
Normal parasternal long axis view
Pericardial effusion in parasternal long axis view (note fluid tracking anterior to descending aorta)
LUQ
Orient the probe in the longitudinal plane, indicator facing towards patient’s head, in the 5-9th intercostal space, posterior axillary line.
Rotate the probe on its axis to obtain an imaging window through the rib shadows
If difficulty in obtaining an image, begin by sliding the probe posteriorly, such that the sonographer’s knuckles are touching the bed. Then angle the probe such that the probe head is pointing anteriorly, with the probe at approximately 20°-30° angle to to bed
Attempt to obtain an image including the patient’s diaphragm, spleen, and L kidney, in similar orientation to RUQ view.
Be sure to fan through the entire organ in the anterior/posterior dimension
Similar to the RUQ view, you may need to perform serial scans at different levels in order to obtain a complete ima
In this view, fluid will appear as an anechoic stripe between either the spleen and kidney, or, more commonly, between the diaphragm and spleen.
To extend this view for the eFAST, simply slide the probe more cephalad, until the diaphragm line appears in the center of the screen. Intrathoracic fluid will again appear superior to this line and will appear anechoic.
Notes:
This is often the most difficult view to obtain on the FAST exam. A general rule of thumb if you are having difficulty is “more to the head, and more to the bed”. This is due to the more cephalad and posterior imaging window provided by the spleen, which is much smaller than the liver.
Make sure to fan through the most inferior portion of the kidney, as this is another place fluid can collect (left paracolic gutter)
Normal LUQ view
Positive intraperitoneal fluid LUQ view (note prominent subdiaphragmatic fluid)
Pelvic
Orient the probe in the midsagittal plane, just superior to the pubic symphysis with the probe indicator facing towards the patients head.
Fan in the right to left directions in search of the urinary bladder, which will appear as a cystic structure in the pelvis. If unable to visualize the bladder, adjust the probe in the cephalad/caudal direction until it comes into view.
Once the bladder is in view, adjust the angle of the probe to ensure the entire length of bladder is in view. Fan left to right to visualize the entire width of the bladder
Rotate the probe 90°, counterclockwise, now oriented such that the indicator is facing to the patients right
Fan the probe inferior to superior, making sure to visualize the entire bladder.
Free fluid will appear as anechoic stripe/fluid collection in the far field, posterior to the bladder
Notes:
This view is best obtained prior to placing a foley catheter (or having patient urinate) as the collapsed bladder is much more difficult to image.
Remember to keep enough depth behind the urinary bladder on the screen, as you may miss fluid posteriorly with an improper depth setting
In the event the bladder is collapsed, aim more caudally to obtain the views.
You will likely need to adjust the gain down in this view, as the posterior enhancement from the fluid filled bladder can obscure fluid present posteriorly
Normal Pelvic/bladder view
Positive intraperitoneal fluid pelvic view (longitudinal)
Thoracic (eFAST)
These views rely on the presence of either lung sliding (created from sliding of visceral on parietal pleura) or reverberation artifact (‘comet-tail’). Absence of these indicates presence of pneumothorax.
Orient the probe in the longitudinal plane, over the anterior chest wall, 3rd-4th intercostal space in the the midclavicular line, with the probe marker facing towards patients head.
Identify the rib shadow of the adjacent two ribs. Look between these areas for the hyperechoic line which represents the pleura
Look for evidence of lung sliding (shimmering) or comet tail artifacts
If unsure of lung sliding, switch to M-Mode while probe held over area of interest
Watch for evidence of sliding with respirations
No sliding appears as flat lines across the screen deep to the pleural line (bar-code sign)
Sliding will appear as grainy mixed echogenicity below pleural line (sandy beach or ‘seashore’ sign)
Repeat for contralateral side
NOTES:
You will need to decrease the depth when switching from abdominal views to thoracic view
If you have difficulty obtaining an adequate image with the phased array probe, switching to the linear probe can provide better resolution
Broken ribs may hinder the assessment; if encountered, attempt exam at a different rib space. Subcutaneous air will also obscure visualization of pleura
Presence of a ‘lung point’- identification of transition point between normal lung and absence of sliding approaches 100% sensitivity for pneumothorax
Lack of pleural sliding may be normal in certain conditions (ARDS, lung scarring, prior pleurodesis)
Normal Lung sliding example (phased array probe)
Normal Lung- Comet Tail artifact
Normal Lung sliding (linear probe)
Pneumothorax with no lung sliding (Linear Probe)
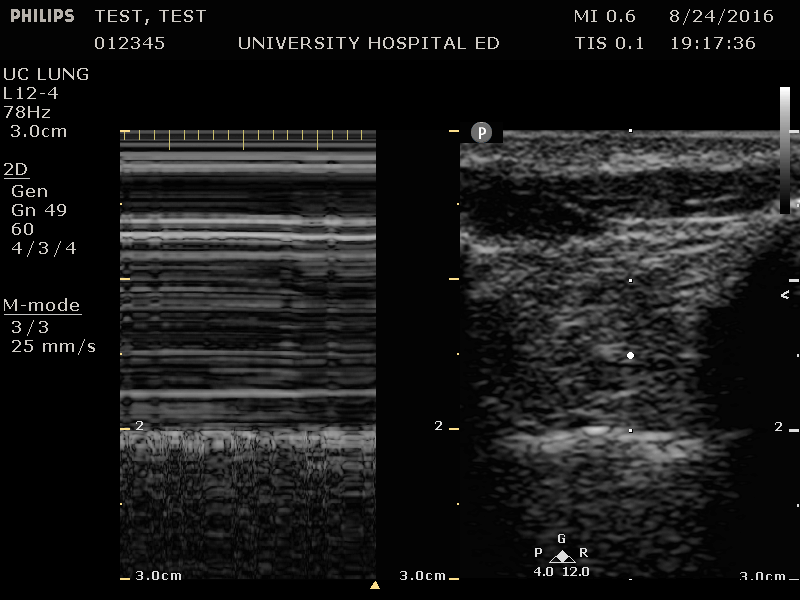
Normal Lung- M-mode (seashore sign)
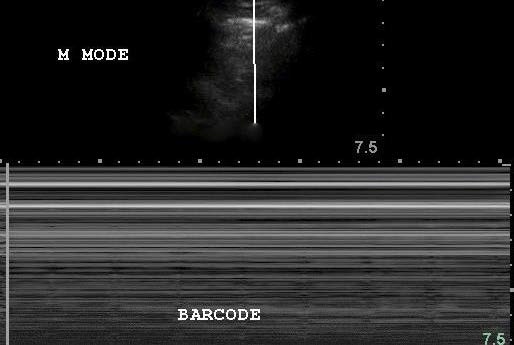
Pneumothorax- M Mode (barcode sign)
PATTIES PEARLS

-Dimming the lights (if possible) will allow for better contrast on monitor and assist gain adjustment.
-Make sure to fan through the entire antero-posterior dimension of organs in order to obtain adequate evaluation for free fluid- especially in RUQ/LUQ where this may require multiple imaging windows.
-In the RUQ/LUQ views be sure to have the kidneys in field of view. This ensures you are imaging posteriorly enough to pick up free fluid. Similarly, make sure you are at this level when sliding up to image the thorax for eFAST.
-Subcutaneous emphysema will obscure underlying structures.
-Clotted blood may appear mixed degrees of echogenicity. As such, be aware the fluid you are looking for may not always be purely anechoic.
-If any of the landmarks (spleen, kidney, etc) are not clearly visualized, the entire FAST must be recorded as inadequate.
Written by: Aalap Shah, MD
Peer Reviewed by: Lori Stolz, MD, RDMS
Images obtained by Pattie Smith, RDMS and Aalap Shah, MD except as otherwise noted
References
American Institute of Ultrasound in Medicine, American College of Emergency Physicians. AIUM practice guideline for the performance of the focused assessment with sonography for trauma (FAST) examination. J Ultrasound Med. 2014 Nov. 33 (11):2047-56
Bahner D, Blaivas M, Cohen HL, Fox JC, Hoffenberg S, Kendall J, et al. AIUM practice guideline for the performance of the focused assessment with sonography for trauma (FAST) examination. J Ultrasound Med. 2008 Feb. 27(2):313-8
Dawson, M., and M. Mallin. Introduction to Bedside Ultrasound: Volume 1. Lexington, KY: Emergency Ultrasound Solutions, 2013. ebook
Kirkpatrick AW, Sirois M, Laupland KB, Liu D, Rowan K, Ball CG, et al. Hand-held thoracic sonography for detecting post-traumatic pneumothoraces: the Extended Focused Assessment with Sonography for Trauma (EFAST). J Trauma. 2004 Aug
Montoya J, Stawicki SP, Evans DC, Bahner DP, Sparks S, Sharpe RP, et al. From FAST to E-FAST: an overview of the evolution of ultrasound-based traumatic injury assessment. Eur J Trauma Emerg Surg. 2015 Mar 14.
Noble, Vicki E., and Bret Nelson. Manual of Emergency and Critical Care Ultrasound. Cambridge: Cambridge UP, 2011. Print.
Richards, John R., and John P. McGahan. "Focused Assessment with Sonography in Trauma (FAST) in 2017: What Radiologists Can Learn." Radiology 283.1 (2017): 30-48.
Smith, Pattie. Bedside Ultrasound Guide for Emergency Medicine. Cincinnati, OH. Print