Indications
- Blood (suspected subarachnoid hemorrhage with a negative head CT)
- Infection (meningitis, meningoencephalitis)
- Pressure (Idiopathic Intracranial Hypertension aka Pseudotumor Cerebri)
- Other Neurologic Disorders (e.g. multiple sclerosis, Guillain-Barre Syndrome)
Contraindications (1)
Absolute - Skin Infection overlying puncture site
Relative
- Increased ICP due to a space occupying CNS lesion (particular caution with patient’s with lateralizing neurologic signs/symptoms as LP could cause of worsen herniation syndromes)
- Risk of herniation significant with brain abscesses
- Acquired/Inherited Coagulopathies (consider risk/benefit and correction of coagulopathy prior to performing the procedure)
- Platelets < 20,000
- INR > 1.5
- Heparin or LMWH in past 24h
- Trauma to Lumbar Vertebra
Complications
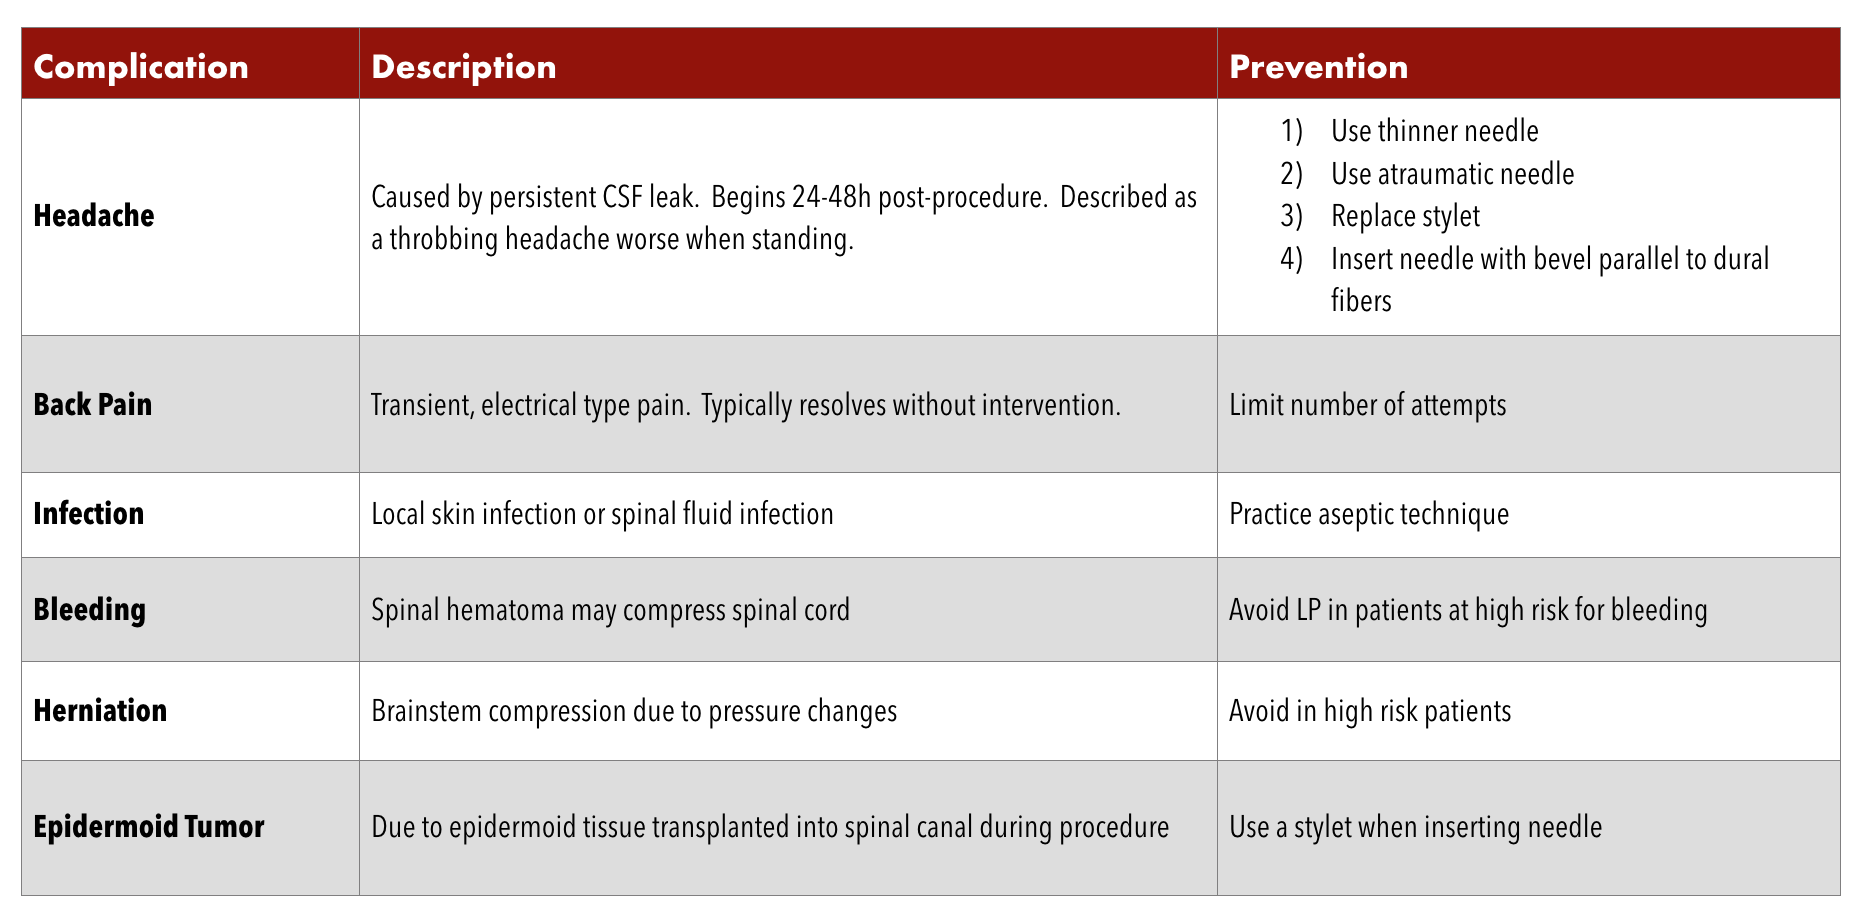
When to get a CT prior to LP?
ACEP’s clinical policy states that adults exhibiting signs of increased intracranial pressure need imaging prior to a LP (Level C Recommendation) (2). They specifically include the following as signs of increased intracranial pressure:
- Papilledema
- Absent venous pulsations on funduscopic examination
- Altered Mental Status
- Focal Neurological Deficits
- Signs of Meningeal Irritation
The data on this is extremely poor and is based mainly on case series of herniation occurring after LP in patients with increased ICP. One study showed that the physician’s clinical impression had the highest predictive value in identifying patients with a contraindication to LP. The take home point from all of this seems to be to get imaging if you suspect increased ICP.
Procedure
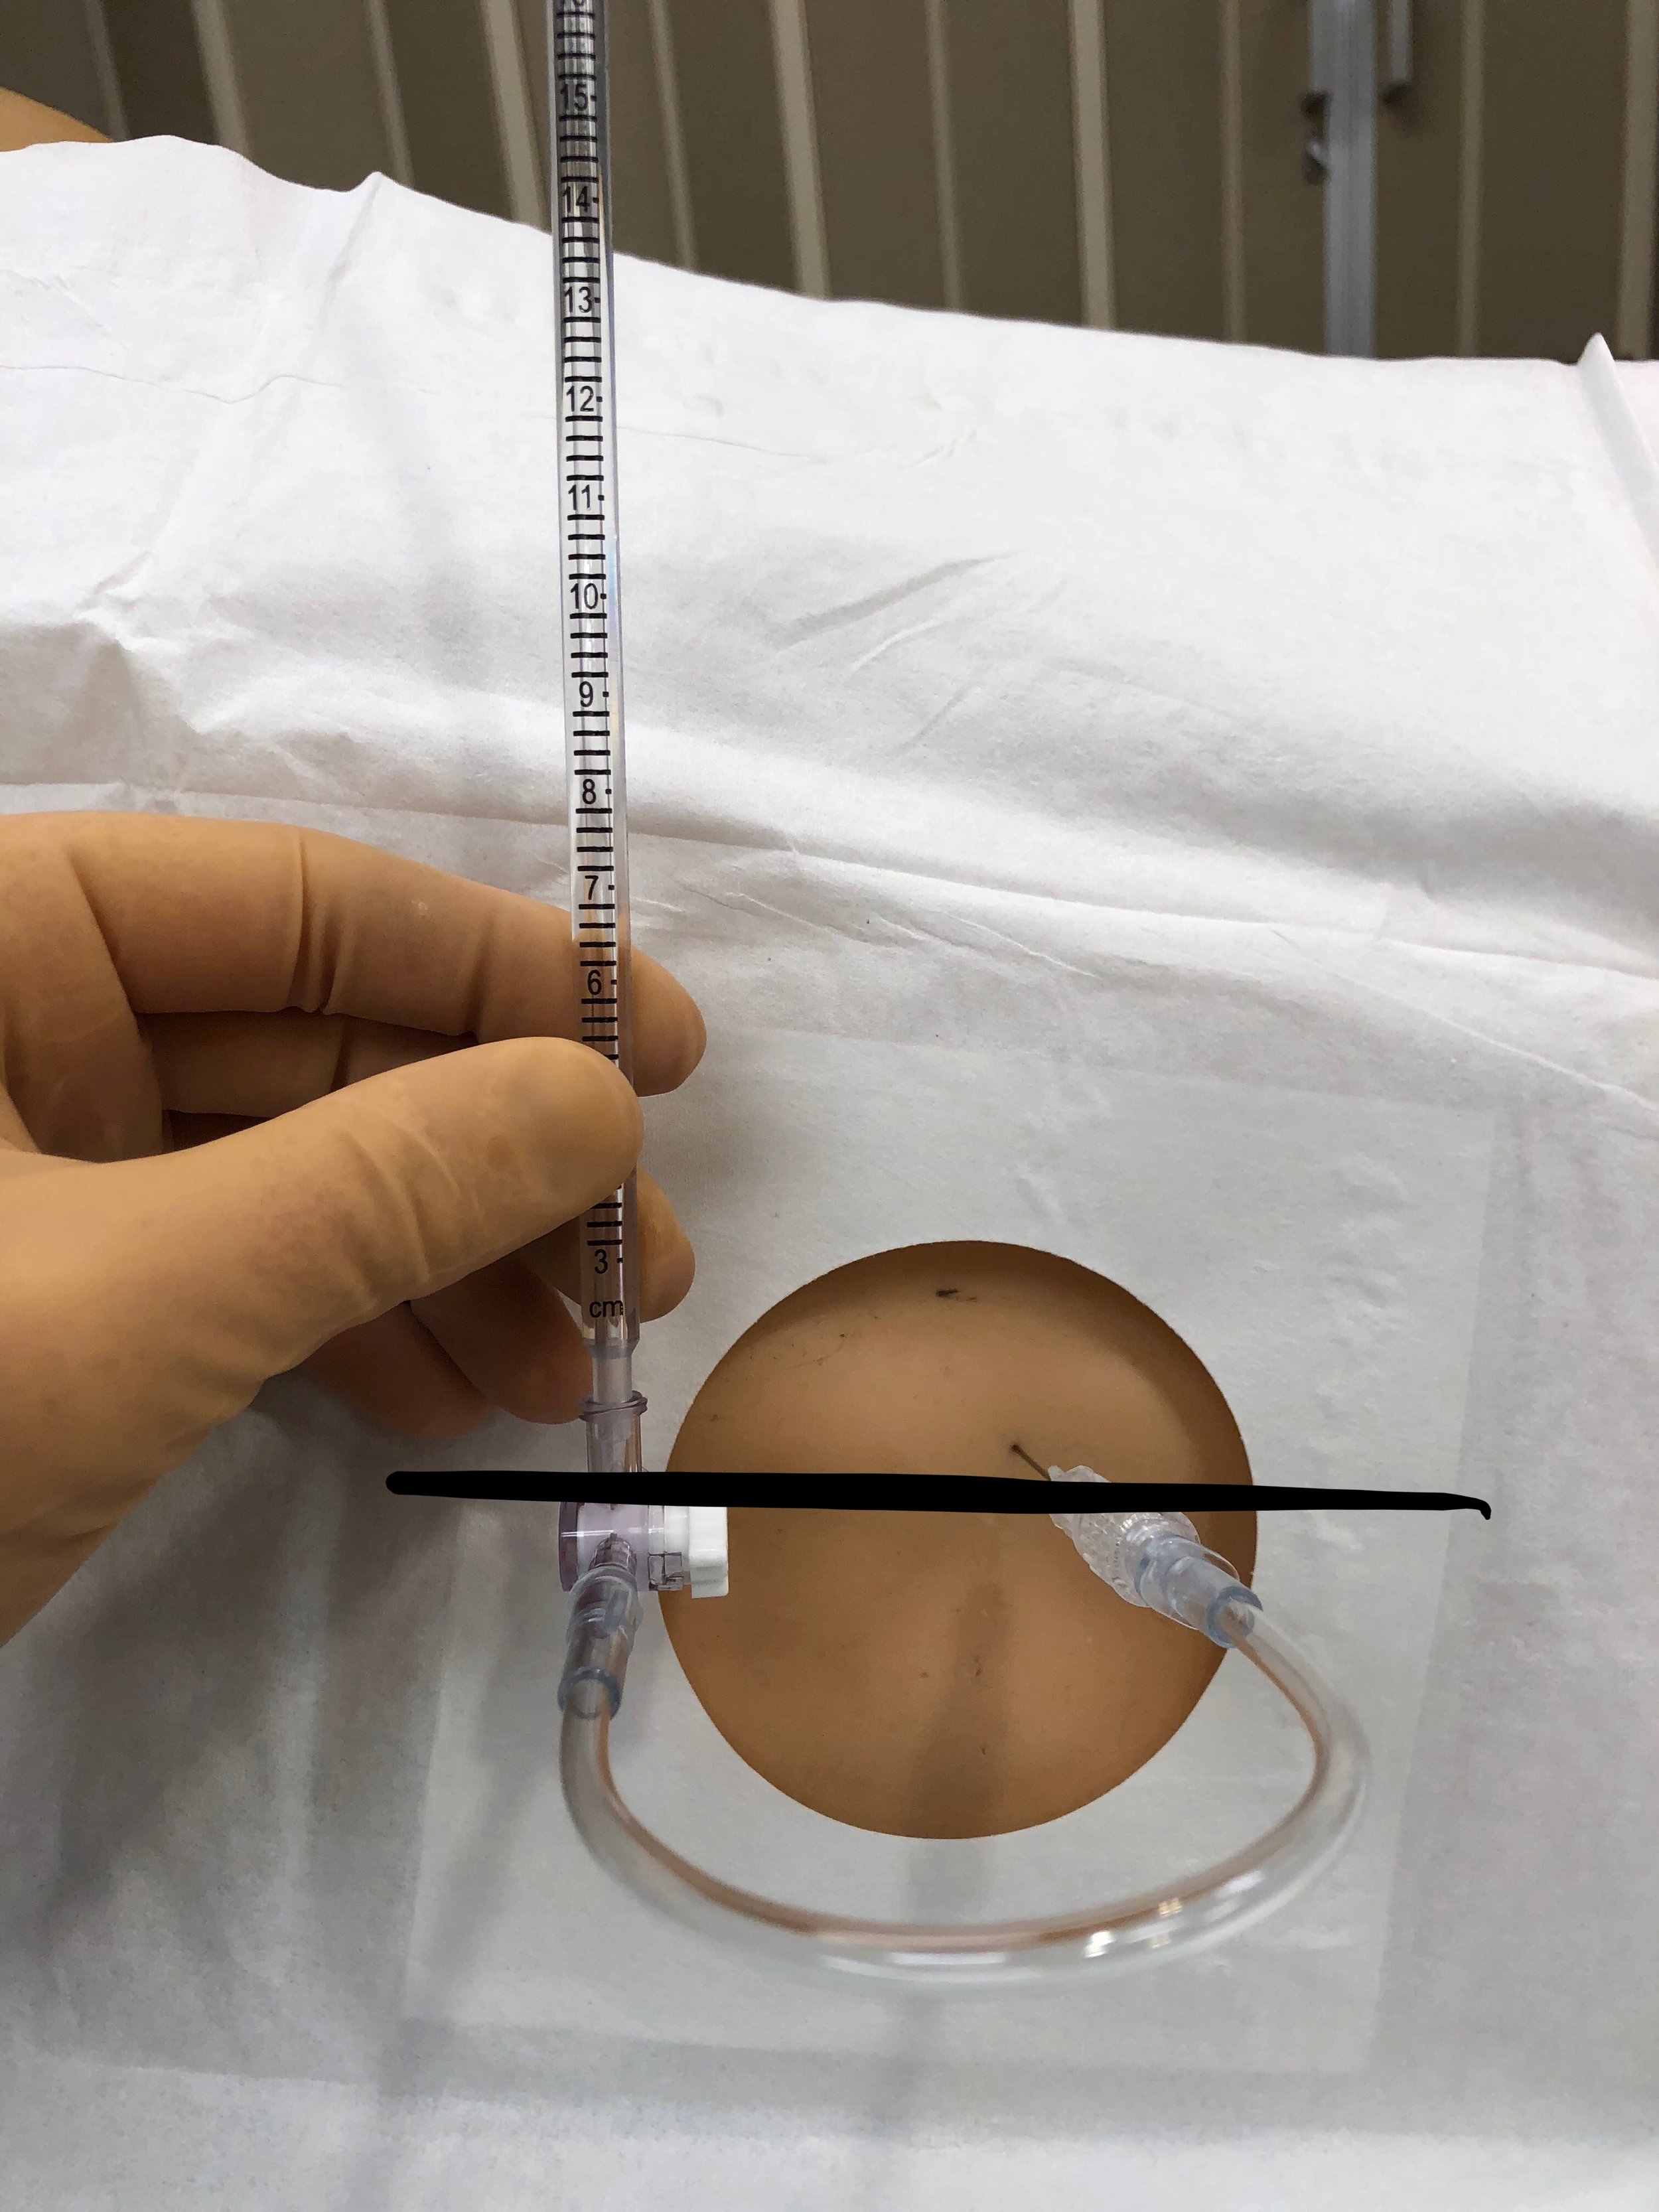
Image 1 - Proper Manometer Set Up
- Preparation - Get your lumbar puncture kit, ensure room is set up conveniently
- Positioning (see below for more details on proper positioning)
- No difference in success rate or complications between Lateral Decubitus and Sitting position
- Lateral Decubitus position allows for immediate measurement of opening pressure without patient repositioning.
- Location
- Identify L4 using iliac crests
- Can enter either L3-L4 or L4-L5 interspaces
- Mark entry point (can use plastic hub of needle)
- Prep and Drape
- Clean area using chlorhexidine or iodine
- Get sterile, place drape over area
- Anesthesia
- Using 1% lidocaine, make small wheal at the spot you previously marked
- Inject deeper through wheal, hub needle while injecting
- Needle Insertion
- Needle bevel should be oriented in parallel to the line of the patient's spine (See Figure X)
- Aim the needle slightly cranial (aiming towards the umbilicus)
- Remove stylet periodically to look for spinal fluid
- As you advance the needle, the feel of the tissues should be like you are pushing the needle through clay - it'll offer some resistance, there may be some 'grittiness,' but it should not completely halt your progress.
- Pressure Measurement
- Patient must be in lateral decubitus position with legs extended for accurate pressure measurement
- Attach manometer, identify level at which spinal fluid travels up tube (See Image 1)
- Can also measure closing pressure after fluid removal for treatment of Idiopathic Intracranial Hypertension.
- Fluid Collection - Collect 1-2 mL’s per tube, can collect more in final tube for special tests
- Cleanup
- Remove needle after replacing stylet
- Place dressing over insertion site
Positioning
This is one of the most important and overlooked part of the LP. Positioning the patient properly is pivotal to increasing the success rate of the procedure. Increasing the interspinous distance allows for a larger space for the spinal needle to enter. To increase this distance, the patient needs to flex their lumbar spine as much as possible. One way of assisting this is to support the patient’s feet on a stool (See Image 2 below). One study showed that this maneuver increased the interspinous distance by 1.1 mm.
If you are positioning your patient in the lateral decubitus position, the same principles hold true. Flexion of the lumbar spine will help to increase the interspinous distance, allowing more space for the spinal needle to enter. This is accomplished by having the patient in a fetal position with their knees touching their chest. When getting into this position, it is naturally more comfortable for patients to slightly roll one of their shoulders more forward. Doing this causes a subtle rotation in the spine and can make external landmarks more difficult to appreciate (See Image 3 below). The goal of the lateral decubitus position is to have the shoulders and hips be parallel to one another and to be perpendicular to the surface of the bed (See Image 4 below). It is important to remember, however, that if you are measuring opening pressure the patient’s must straighten their legs. Measuring pressure in hip flexion can artificially raise pressures.

image 2 - Sitting position - note the elevation of the feet onto a stool and pillow under the arms which are resting on a bedside table to encourage the "Mad Cat" spinal positioning

Image 3 - Poor Lateral Decubitus Position - Note that in this case the patients right shoulder is slightly forward introducing a subtle rotation throughout the spinal column, making external landmarks more difficult to appreciate
Image 4 - Good Lateral decubitus positioning - note the shoulders and hips are parallel to each other and perpendicular to the bed, making external landmarks more easy to visualize
The Feel
As mentioned above, the 'feel' of the needle advancing through the subcutaneous tissue and interspinous ligaments and tissues is similar to passing a needle through clay. Discernible "pops" as you pass through the ligaments are quite uncommon. You may feel some 'grittiness' as the needle is advanced but it should not offer complete resistance to your forward progress. If you encounter complete resistance, you need to reposition. If you are sure of your insertion site and sure that you are in the midline, as long as you feel the "clay-like" text of the tissues, continue to advance.
When at First You Don't Succeed...
Lumbar punctures can be maddening procedures. Sometimes patient's with seemingly "easy" anatomy end up being exceptionally difficult. Knowing how to troubleshoot is key to the mastery of this procedure.
If, when advancing your needle, you encounter complete resistance...You may be hitting a spinous process. Try the following (in order):
- Pull the needle back to just under the skin surface and direct your needle a bit more cranially (one of the more common issues is that entry angles are 'too flat')
- Pull the needle back to the skin surface and direct your needle a bit more caudally (maybe you were too steep in your initial entry angle)
- Recheck patient positioning - encourage flexion to open interspinous spaces, ensure shoulders and hips are in line with one another (avoid rotational positioning of the spine)
- Withdraw the needle from the skin and recheck your entry site to ensure you are a.) in the midline, b.) at the correct L3-L4 or L4-L5 interspinous level, and c.) that the patient is assiduously positioned
If, when advancing your needle, you encounter no resistance yet get no fluid... You are either off the midline -OR- You may needle a longer needle. Try the following:
- Recheck patient positioning - encourage flexion to open interspinous spaces, ensure shoulders and hips are in line with one another (avoid rotational positioning of the spine)
- Consider checking depth of insertion with ultrasound
If, when advancing your needle, the patient has a severe, lancinating pain shoot down their right/left leg... You are off the midline (either to the right or left. Try the following...
- If the patient had pain down the right leg, pull back to just under the skin surface and redirect your needle slightly towards the left
- If the patient had pain down the left leg, pull back to just under the skin surface and redirect your needle slightly towards the right
Other FOAMed Resources
Diagnostic Lumbar Puncture - Ulster Medical Journal
References
- Euerel, Brian. Spinal Puncture and Cerebrospinal Fluid Examination. Chapter 61. Roberts and Hedges, 6th edition. 1107-1127.
- Edlow, J. A., Panagos, P. D., Godwin, S. A., Thomas, T. L., & Decker, W. W. (2008). Clinical Policy: Critical Issues in the Evaluation and Management of Adult Patients Presenting to the Emergency Department With Acute Headache. Annals of Emergency Medicine, 52(4), 407–436. http://doi.org/10.1016/j.annemergmed.2008.07.001
- Gopol AK, Whitehouse JD, Simel DL, et al. Cranial computed tomography before lumbar puncture: a prospective clinical evaluation. Arch Intern Med. 1999;159:2681-2685
- Doherty CM, Forbes RB. Diagnostic Lumbar Puncture. The Ulster Medical Journal. 2014;83(2):93-102.
- Sandoval M, Shestak W, Stürmann K, Hsu C. Optimal patient position for lumbar puncture, measured by ultrasonography. Emerg Radiol. 2004 Feb;10(4):179-81. Epub 2003 Nov 15.
- Robbins E, Hauser SL. Technique of Lumbar Puncture. In: Kasper D, Fauci A, Hauser S, Longo D, Jameson J, Loscalzo J. eds. Harrison's Principles of Internal Medicine, 19e. New York, NY: McGraw-Hill; 2015.
- Ladde JG. Central Nervous System Procedures and Devices. In: Tintinalli JE, Stapczynski J, Ma O, Yealy DM, Meckler GD, Cline DM. eds. Tintinalli’s Emergency Medicine: A Comprehensive Study Guide, 8e. New York, NY: McGraw-Hill; 2016.