Tube Thoracostomy
Indications
Primary or Secondary Spontaneous Pneumothorax
Clinical suspicion of tension pneumothorax - Unstable Patients (RR >24 breaths/min, HR <60 bpm or >120 bpm, abnormal BP, room air 02 sat <90%, or cannot speak in full sentences)
Large Pneumothoraces (>3 cm Apex-to-Cupola Distance -OR- >2 rib spaces at the apex or 2 cm from the lateral chest wall)
Overt Traumatic Pneumothorax (diagnosed clinically or by CXR)
Hemothorax
Empyema
Preparation
Triangle of Safety - http://www.oxfordmedicaleducation.com/procedures/intercostal-drain/
Obtain Informed Consent if able including a discussion with the patient about potential complications of the procedure
Dress – Mask, eye shield, gown, sterile gloves, headwear
Ensure that the Pleura-vac is set up
Position Patient
Head of bed 30 to 45 degrees (unless the patient is in spinal precautions as a result of trauma)
Using a soft wrist restraint, Secure the arm on the affected side out of the field
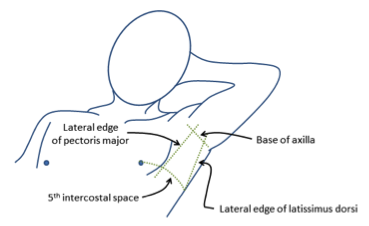
Identify Site of Procedure
“Triangle of safety” - Lateral edge of the pectoralis major, mid-axillary line, and above the 5th intercostal space (nipple line in males, inframammary crease in females)
Insertion site should be in the ANTERIOR axillary line at the 4-5th intercostal space
Place patient on nasal oxygen
Antibiotics - Give one dose of intravenous cefazolin x 1 gram (Alternative: Clindamycin 600 IV)
Pain control and sedation for patient
Fentanyl, Morphine, Dilaudid, or Ketamine (in analgesic dosing)
Consider procedural sedation with Ketamine
Tube InsertioN
Clean the insertion site with chlorhexidine or iodine.
Create a sterile field by draping four sterile towels and a large sterile drape to frame the insertion site.
Maintain sterile field throughout the procedure.
Prepare the chest tube by cutting the external end to fit onto the atrium tubing and clamp it with Kellys.
Anesthetize the skin and subcutaneous tissue. Too little anesthesia is the most common mistake.
Start with the skin and subcutaneous tissue using lidocaine 1% with epinephrine.
Advance the needle until it hits the rib inferior of the selected intercostal space and inject anesthetic over the periosteum. Then inject over the superior rib in a similar manner.
While continuously aspirating, advance the needle over the inferior rib and into the pleural space (evidenced by return of air or blood). Withdraw the needle until the return of air ceases and inject onto the parietal pleura.
Make a superficial skin incision, 1.5-2 cm in length, parallel to and overlying the rib inferior to the selected intercostal space.
Create a subcutaneous track using Kelly clamps for blunt dissection.
Keeping the Kellys in the closed position, advance over the inferior rib until the pleura is breached (confirm with “pop”/loss of resistance), then open the Kellys and withdraw them to create a tract.
Insert one finger into the pleural space to confirm intrapleural location and rotate to identify lung and break up adhesions.
Advance the chest tube into the pleural space using Kellys to guide it into appropriate position, anterior and superior for pneumothorax and posterior for hemothorax.
Remove the Kellys and advance the chest tube to the appropriate depth.
Confirm with chest radiograph before securing.


Securing the Tube
Close half of incision with a single simple suture
Place a second suture close to the thoracostomy tube
Wrap remaining suture around tube to anchor and, leaving the ends long, tie down to the thoracostomy tube
This tie will be cut upon removal of the tube and the long ends can be used to close skin after tube removal
Occlusive dressing
Cut a Y-cut into stack of 4x4 gauze ~2-3 layers thick
Apply bacitracin/petroleum on one side of the gauze
Place petroleum impregnated gauze around the thorocostomy tube with the petroleum against to the incision
Apply 2-3, 4” by 8” tegaderm pieces over occlusive dressing to hold it in place


Pigtail Tube Thoracostomy
Small bore, tube thoracotomy placed via a Seldinger Technique is increasingly used in trauma patients with pneumothorax and small volume hemothorax as well as in patients with spontaneous pneumothorax. The consent, preparation, and positioning of the patient is identical to that described above. Prepare the pigtail catheter by inserting the internal stylet into the pigtail catheter.

Tube Insertion
Clean and drape the insertion site as described above. Anesthetize the skin and subcutaneous tissue as described above
Attach a syringe with a small volume of saline or local anesthetic to the introducer needle
Insert the introducer needle into the desired intercostal space, maintaining negative pressure while advancing
When a loss of resistance is felt on the plunger and bubbles of air freely enter the syringe chamber, remove the syringe from the introducer needle
Advance the wire through the introducer needle and into the pleural space (approximately 15 cm)
Remove the needle leaving the wire in place
Using a scalpel, create a generous knick in the skin surround the wire to allow passage of a dilator
Maintaining tension on the wire, advance the dilator over the wire to create a subcutaneous tract that will allow passage of the tube. Removed the dilator
Advance the tube over the wire and into the pleural space.
Remove the internal dilator/stylet from the pneumocath
Attach the one-way Heimlich valve (blue towards patient) to the connector tubing. Connect the Heimlich valve to the Atrium tubing. You will likely need to cut the Atrium tubing to allow the Heimlich valve to connect. Connect the Atrium to suction.


Tube securement and dressing is performed in a manner identical to that described above.
Full Videos of the Procedure

NEJM Tube Thoracostomy Video (Institutional Subscription Required)
Additional Options for Securing your Chest Tube
Dr. Omedary - Surgical Knot Tying:Drain Stitch. In this video I show you how to tie an easy drain stitch. Refer to my other videos for help with one and two-handed ties.
Emergency Trauma Management - How to Secure Your Intercostal Catheter/Chest Tube


References
Kirsch, T. Tube Thoracostomy. Roberts and Hedges Clinical Procedures in Emergency Medicine. Ch. 10. 175-196.
Gonzales RP and Holevar MR: Role of prophylactic antibiotics for tube Thoracostomy in chest trauma, Am Surg 1998, 64:617-620.