This guide is intended to provide the basics on acquiring TEE images and assumes basic familiarity with transthoracic echocardiography (TTE). See the TTE imaging guide for information on acquiring and interpreting TTE images. A quick reference TEE guide can be found at the bottom of this page.
Background
Finding and maintaining adequate transthoracic echo (TTE) views can be a daunting task during cardiac arrest resuscitation. Cardiopulmonary resuscitation (CPR), defibrillator pads, and ongoing procedures leave limited space on the chest for finding a window. Even when there is adequate access to the chest, views may be limited due to fractured ribs, subcutaneous air, or body habitus. Additionally, TTE use during cardiac arrest resuscitation has been shown to prolong pulse checks, decreasing the efficacy of CPR.(1,2) Transesophageal echocardiography (TEE) can overcome these limitations. With closer proximity to the heart and absence of obstructing thoracic structures commonly encountered in TTE, TEE allows more consistent acquisition of high-resolution cardiac images. Once inserted, the probe can be left in the esophagus or stomach with the controller placed out of the way, allowing for real-time cardiac imaging without impeding the resuscitation.
TEE has traditionally been used in cardiology and cardiac surgery for guiding the placement of cardiac devices, evaluating for thrombi, valvular evaluations, diagnosing endocarditis, and numerous other applications.(3) In the emergency department, focused TEE can be utilized during cardiac arrest to evaluate cardiac activity and identify reversible causes of arrest, similar to TTE.(4) Additionally, TEE has the unique ability to monitor the quality and placement of chest compressions in real-time, and can aid in rhythm identification such as distinguishing fine ventricular fibrillation from asystole and pseudo-pulseless electrical activity (PEA) from true PEA.(5) Furthermore, TEE can be utilized in critically ill and peri-arrest patients to identify the etiology of shock, provide targeted therapy, and monitor dynamic changes throughout the resuscitation. TEE can also guide emergent endovascular procedures such as cannulation for ECMO.(6)
For emergency providers already familiar with TTE, TEE is a readily learnable skill. One study demonstrated that after a 4 hour simulator-based course, emergency physicians with prior TTE experience (the majority of which were not fellowship trained in ultrasound) were able to reliably obtain clinically relevant TEE images over 99% of the time with image quality consistently superior to that of TTE.(7) A similar study found that after an 8 hour course, emergency providers were able to successfully obtain 4 focused views for resuscitative TEE 100% of the time in cardiac arrest patients with an average time from ED arrival to first TEE image of 12 minutes.(5)
Contraindications
As TEE is an invasive imaging procedure, there are important procedural considerations to ensure the scan is performed safely. Absolute contraindications include active upper gastrointestinal bleeding, known esophageal anatomic abnormalities such as a diverticulum or stricture, recent esophageal or gastric trauma or surgery, and prior esophagectomy.(3) Relative contraindications include recent upper gastrointestinal bleeding, remote esophageal procedures or surgeries, and esophageal varices.(3) Providers may choose to avoid obtaining gastric views in patients with known hiatal hernias. While coagulopathy and thrombocytopenia are often also cited as relative contraindications, in one case series of 80 patients undergoing resuscitative TEE with high bleeding risk (defined in the study as active anticoagulation, INR >2, aPTT >40, fibrinogen <150 mg/dL or platelets <50,000/μL), there was no difference in subsequent upper esophageal bleeding when compared with patients who with a lower bleeding risk.(8)
Complications
Much of the data on TEE complications comes from anesthesia literature on intraoperative TEE, which reports an overall complication rate of 0.2-3%.(3,9) Complications can include oral or dental trauma, esophageal perforation or injury, vagal reaction, arrhythmias, laryngospasm, endotracheal tube dislodgement, and aspiration.(3,10) In one study of focused TEE performed by emergency physicians for cardiac arrest and shock, out of 557 cases, there was only one complication felt to be directly related to TEE, an endotracheal tube dislodgement (overall complication rate of 0.1%).(7) There were no cases of esophageal injury in this case series.(7) In order to minimize the risk of esophageal injury, providers should avoid excessive or rapid probe manipulation, particularly when the probe tip is within the esophagus or while CPR is ongoing.
While theoretical concern has been expressed over the safety of defibrillation during TEE, several case series have demonstrated no harm to the equipment, patient, or provider holding the probe when defibrillation is performed with a TEE probe in use.(11) As a protective measure, TEE transducers are designed to insulate from electrical shocks. The integrity and functionality of this insulation is evaluated and tested between each use as part of required standard cleaning protocols.

Anatomy of the Probe
The TEE probe has 3 main components: a probe head, a controller, and a flexible endoscopic shaft. The probe head is located on the distal end of the probe and is inserted into the patient. It contains the piezoelectric crystals that create the ultrasound beam used for imaging. As placement of the probe within the patient limits the ability to perform many of the typical manual probe movements utilized in TTE (fanning, rocking, sliding etc.), digital controls allow for manipulation of the TEE probe head angle and orientation and fine-tuning of the TEE image. These controls are housed on the controller, which is held by the provider during imaging. Depending on the unit model, these controls may additionally be present on the ultrasound machine itself. The controller and probe head communicate through the flexible endoscopic shaft.
Probe Manipulation and Knobology
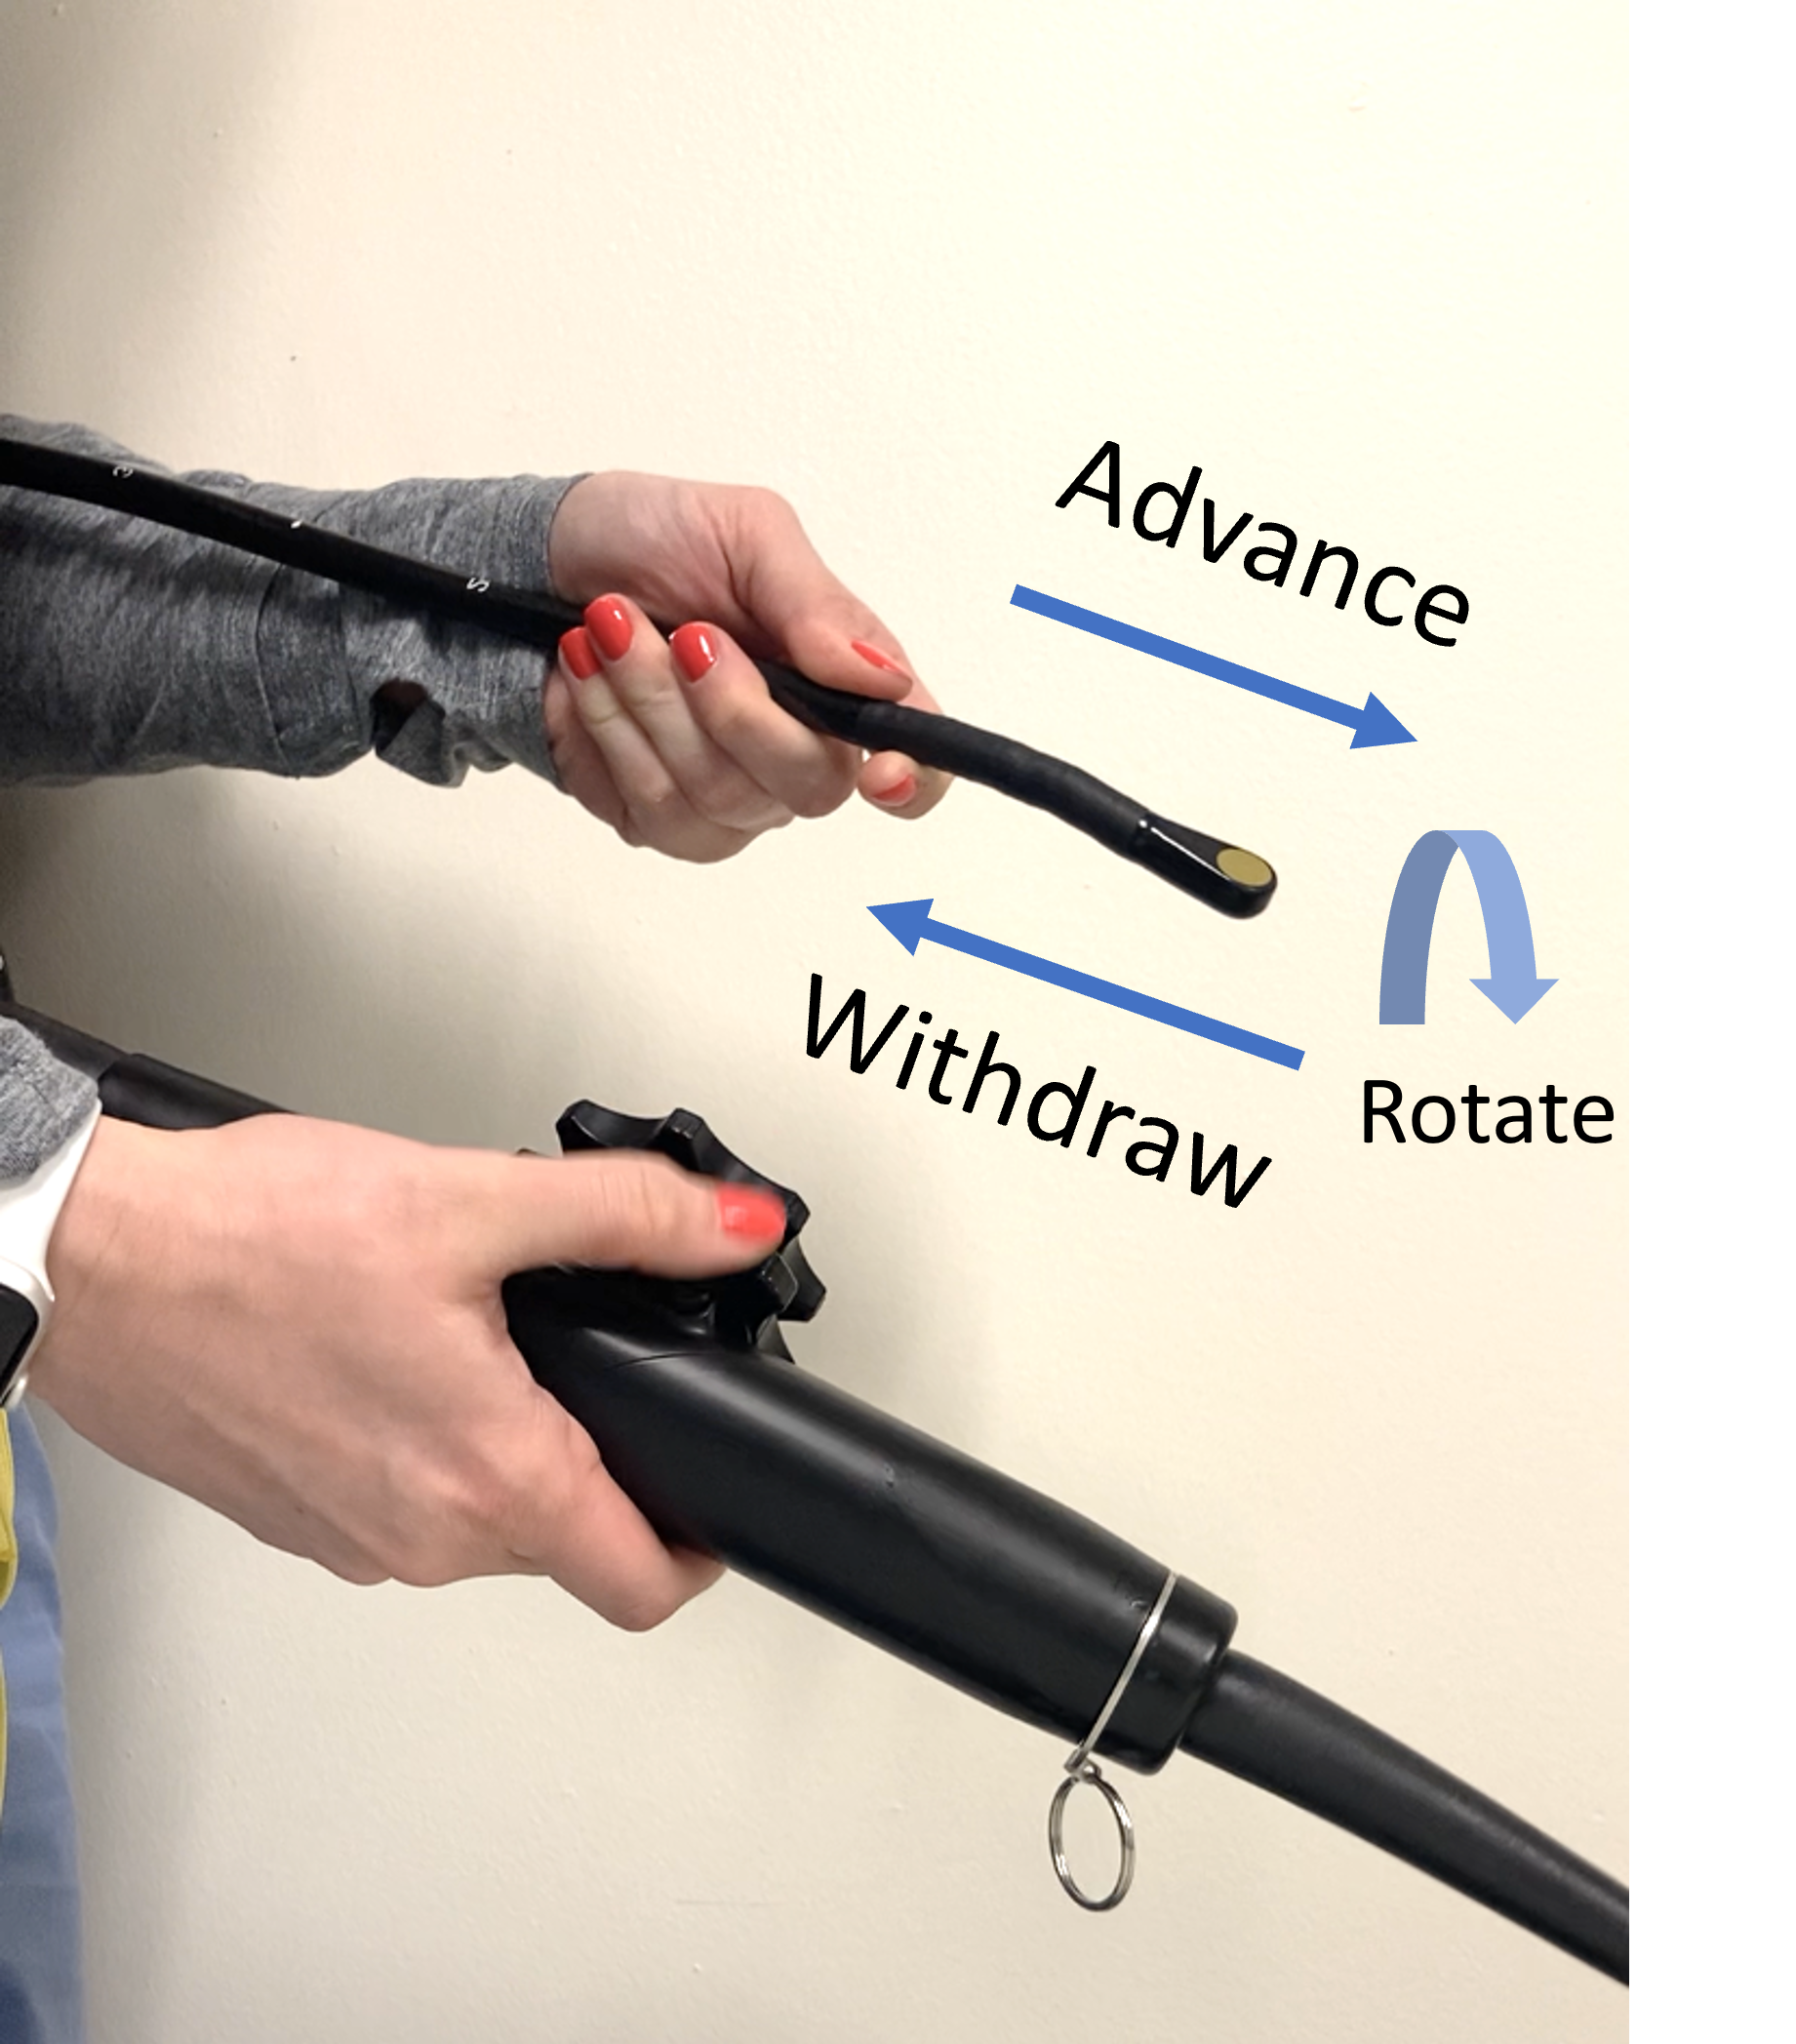
The probe can be directly advanced or withdrawn within the esophagus and stomach. The probe can also be rotated to face the right or left of the patient within the esophagus by manual movement of the probe controller with the wrist.
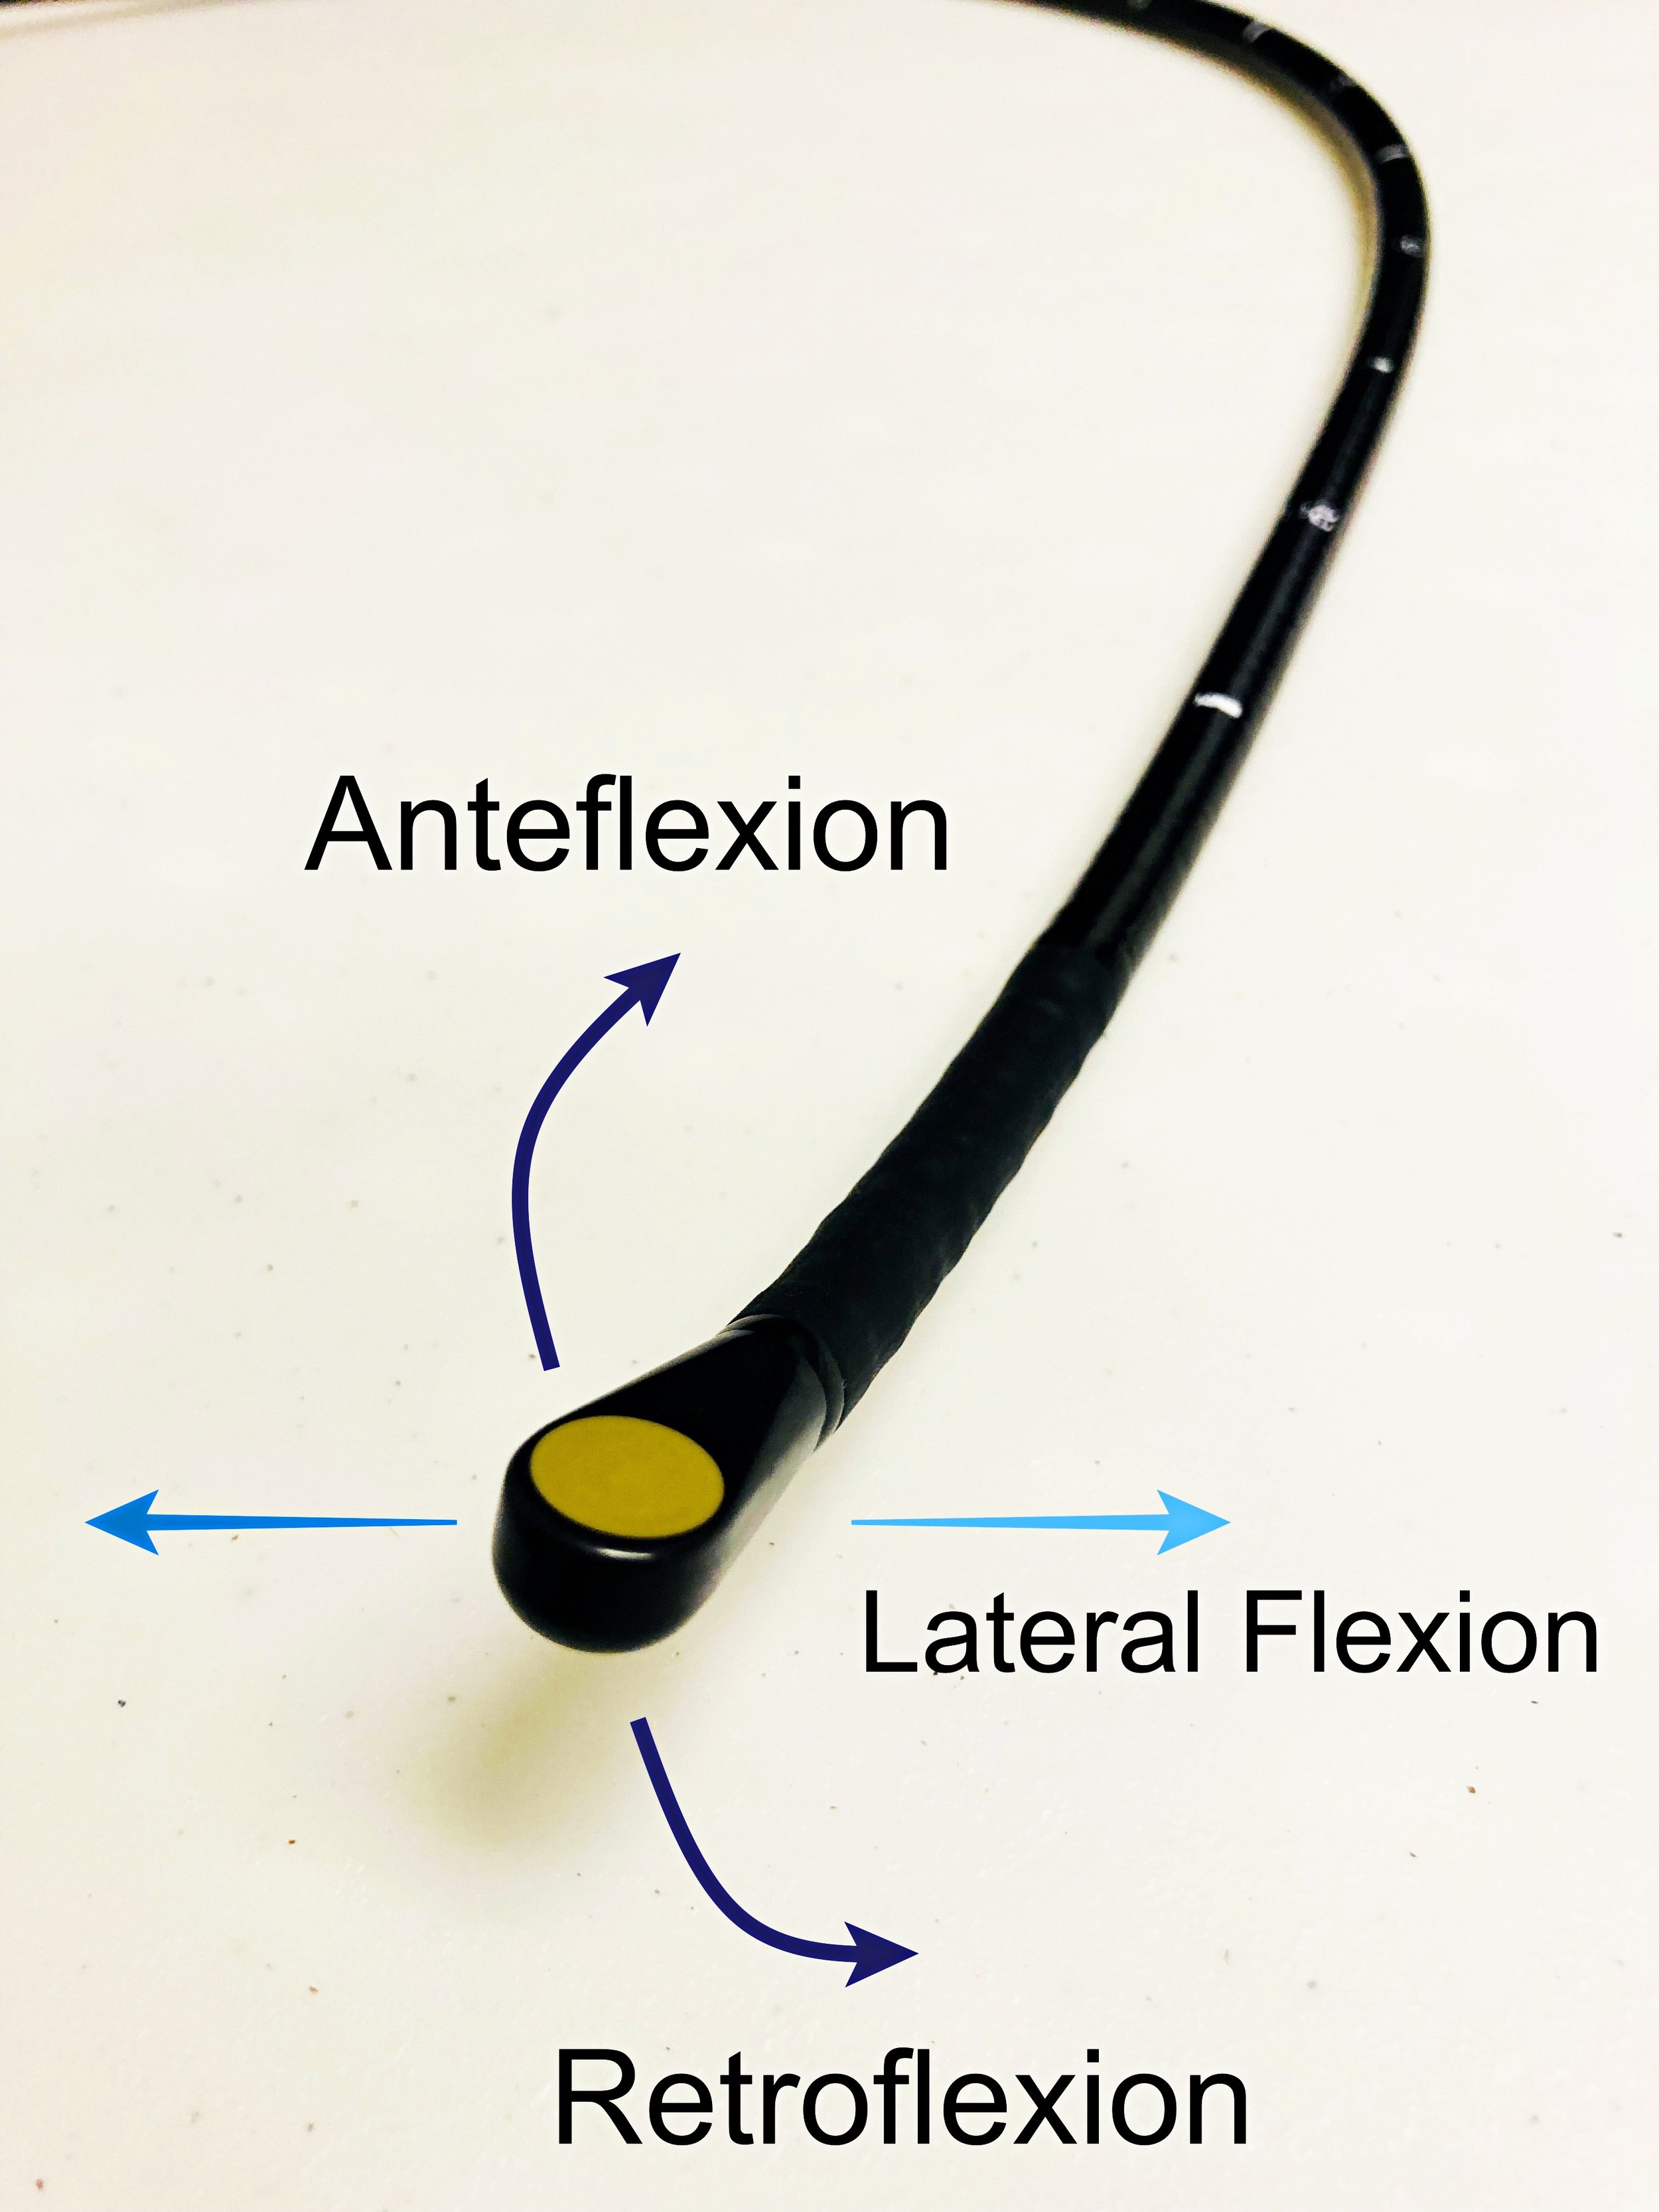
Anteflexion and Retroflexion
The Big Wheel is used to control the probe head’s movement in the anterior or posterior direction, known as anteflexion or retroflexion. The relationship between clockwise or counterclockwise rotation of the Big Wheel and resulting ante- or retroflexion can vary based on probe model and orientation of the probe, so practice ante- and retroflexing the probe prior to insertion to get comfortable with how this functionality works on the specific probe being used. However, on most probes, counterclockwise rotation of the Big Wheel (away from the flexible shaft) will anteflex the probe head to view more anterior structures whereas clockwise rotation (toward the flexible shaft) will retroflex the probe head to view more posterior structures.
Lateral Flexion in Left and Rightward Planes
The Small Wheel is used to laterally flex the probe in the left and right directions. This functionality is less commonly used in obtaining resuscitative TEE views.
Omniplane/Multiplane

The crystals within the probe head can be rotated by using the two omniplane buttons to rotate the plane of the imaging beam up to 180°in a counterclockwise direction without physically moving the probe head. At 0°, the beam projects out from the probe in a transverse or axial orientation parallel to the diaphragm. At 0°, the patient’s right will be on the left side of the screen (conventional cardiac format). At 90°, the beam projects out in a longitudinal orientation perpendicular to the diaphragm. At 180°, a transverse plane is once again obtained, producing a mirror image to that at 0° with the patient’s right on the right side of the screen. A pictogram dial on the screen displays the current omniplane angle of the beam. A near infinite number of imaging planes can be obtained when combining multiplane adjustments with manual and digital manipulation of the probe head.

Probe Locks
There are also locks on the probe controller which can be used to hold the probe in its current ante- or retroflexion and lateral flexion. This functionality is typically utilized in cardiac surgery when specific views are required to be held for extended periods of time. Probe lock utilization is unnecessary in resuscitative TEE and can cause inadvertent injury if the probe is moved within the esophagus while locked in a certain position.
Inserting the Probe

The probe should be inserted such that the face of the probe head is directed anteriorly towards the patients’ tongue. Insert the probe head in the midline along the base of the tongue. Keep the probe head unlocked and midline to avoid catching the probe on pharyngeal and laryngeal structures such as the pyriform fossa and arytenoid cartilages. Direct or video laryngoscope can also be used to help visualize esophageal insertion but is not required.
In the ED setting, TEE should only be performed on intubated patients. Care must be taken not to dislodge the endotracheal tube during probe insertion and manipulation. Patients should be continuously monitored on continuous pulse oximetry and waveform capnography with attention to the endotracheal tube depth before and after the procedure. If able, the stomach should be emptied of gastric contents via an orogastric tube prior to placement of the TEE probe. After a brief suctioning, the orogastric tube can be removed prior to TEE probe placement.
Utilization of a bite block throughout TEE utilization is required as it minimizes unwanted movement of the probe within the mouth throughout the procedure, and most importantly, protects the TEE probe from damage from dental structures. Pre-loading a bite block onto the TEE probe shaft prior to probe insertion allows for rapid and easy seating of the bite block at the start of the procedure.
Probe insertion can be challenging for a variety of reasons. The loss of muscle tone in intubated and sedated patients can cause the pharynx to collapse. The endotracheal tube itself can also block probe advancement. A jaw-thrust maneuver helps elevate the tongue off the posterior pharyngeal wall and lifts the larynx and endotracheal tube anteriorly, further opening the esophageal inlet.(12) A laryngoscope can also be utilized to perform this maneuver and aid in insertion with direct visualization of the endotracheal tube and the esophagus throughout placement. Generous amounts of gel should be applied to the probe head (and tongue if needed) to facilitate easy passage.
Obtaining the Views
TTE evaluates the heart from the surface of the chest, with the right ventricle and apex closest to the probe. In TEE the probe head is in the esophagus or stomach, which is closest to the left atrium and base of the heart (ie., imaging from a retrocardiac perspective). Therefore, many of the standard views in resuscitative TEE are essentially mirror images to those obtained in TTE.
The American Society of Echocardiography and the Society of Cardiovascular Anesthesiologists published guidelines for a 28-view comprehensive TEE.(3) Given the focused nature of resuscitative TEE, only 4 views are typically used.
The following are starting guides for obtaining the standard resuscitative views. Just as in TTE, anatomic or pathologic factors may limit image acquisition or require fine probe adjustments beyond what is described.
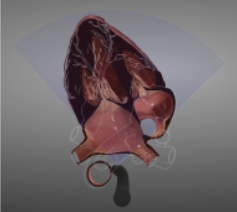
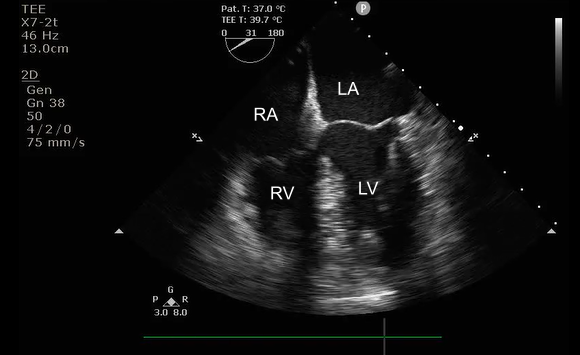
Mid-Esophageal 4 Chamber
The typical “home base” view, which is the easiest initial view to obtain, is the mid-esophageal four chamber view. This will appear similar to the TTE apical 4 chamber (A4C) view, but since the heart is being imaged from the esophagus, the atria will be closer to the probe and appear in the near field rather than the far field. This view can help evaluate left ventricular (LV) and right ventricular (RV) chamber size and function, the presence of pericardial effusions, and mitral valve (MV) and tricuspid valve (TV) pathologies. This is the preferred view for evaluating whether or not a perfusing rhythm is present during pulse checks.
Inserting the probe approximately 30-40 cm should position the probe within the mid-esophagus. The Omniplane should be around 0 to 10°. If your view is foreshortened, slowly retroflex the probe (Big Wheel clockwise rotation) to elongate the ventricles. From here, adjusting the omniplane beam to ~90° can provide an additional 2 chamber view of the left atrium and the left ventricle.

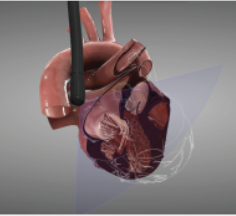
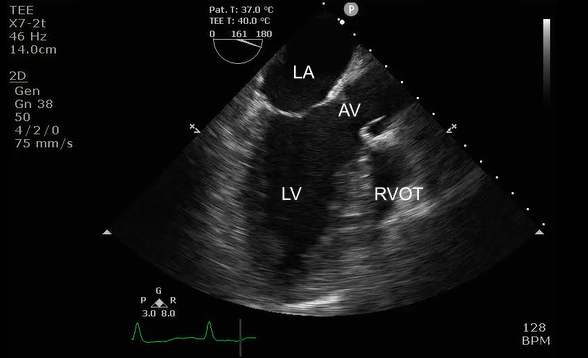
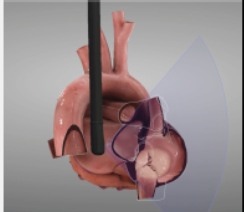
Mid-Esophageal Long Axis
This view will appear like the mirror image of the TTE parasternal long axis (PSLX), with the left atrium closest to the probe head in the near field of the screen and the RV outflow tract (RVOT) furthest from the probe in the far field of the screen. This view can be used to evaluate for LV function, aortic valve (AV) and MV function, and pericardial effusions. This view can also evaluate the quality of CPR and placement of compressions. Optimal compressions should compress the LV and lead to aortic valve opening, whereas incorrect placement of compressions will result in AV valve compression and LV outflow tract (LVOT) obstruction. To obtain this view, from the midesophageal 4 chamber view, adjust the omniplane to 120-140°.

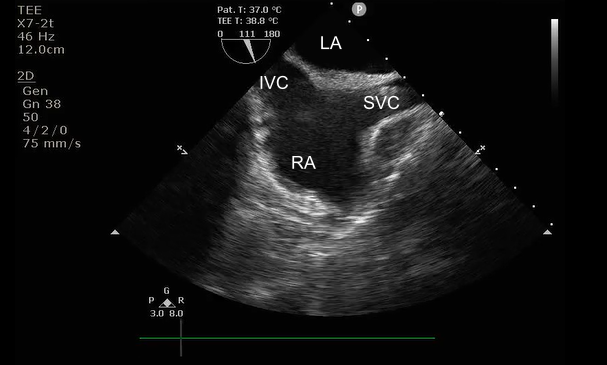
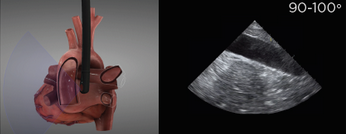
Bicaval View
This view is similar to the IVC view obtained on TTE, but also allows simultaneous visualization of the left and right atrium, interatrial septum, and the SVC. This allows assessments of volume status and can be used during procedures requiring central venous access, such as transvenous pacing or ECMO cannulation, to visualize wires passing into the vasculature.
Start by obtaining a mid-esophageal 4 chamber view. Since the SVC, right atrium, and IVC all lie in a vertical plane, adjust the omniplane to 90-100° (the beam will be oriented perpendicular to the diaphragm). Then, rotate the entire probe toward the patient’s right. The left atrium will be closest to the probe in the near field above the interatrial septum with the SVC, right atrium, and IVC further from the probe. The SVC is visualized on the right side of the screen with the IVC on the left side of the screen. The probe can then be advanced and withdrawn to further center the atria on the screen.
Transgastric Short Axis
This view resembles the TTE parasternal short axis view (PSAX), however the inferior wall of the LV will be closest to the probe head and thus in the near field of the screen, opposite of the PSAX TTE view. Like the PSAX view, this view is useful for assessing LV systolic function, regional wall motion abnormalities, and septal flattening which may be suggestive of increased RV pressures.
From the mid-esophageal 4 chamber view, advance the probe to 40-45 cm to place the probe head in the stomach. Since the stomach lies inferior to the heart, obtaining transgastric views requires anteflexion of the probe head (Big Wheel counterclockwise rotation) to aim the beam toward the heart. Fine-tuning of the omniplane angle will allow for visualization of the LV base, mitral valve, papillary muscles, and apex.


Optional: Aortic Views
The aorta can also be evaluated for pathology such as aortic dissection. While the following describes discrete views of the aorta, in an emergent situation, all of these can be obtained in rapid sequence with a maneuver called ‘running the aorta’. To ‘run the aorta’ start in a transgastric view, rotate leftward until the aorta is visualized and retract the probe to visualize the length of the descending thoracic aorta. Once the arch comes into view, rotate the probe back to the anterior of the patient, gradually rotating rightward to visualize the entirety of the arch and the ascending aorta. Omniplane can be utilized throughout in order to visualize the aorta in both short and long axis.
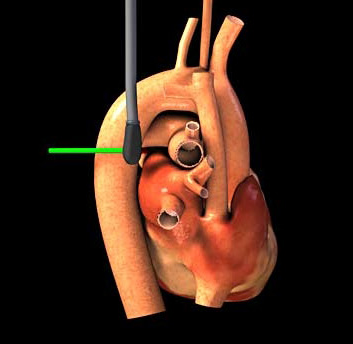
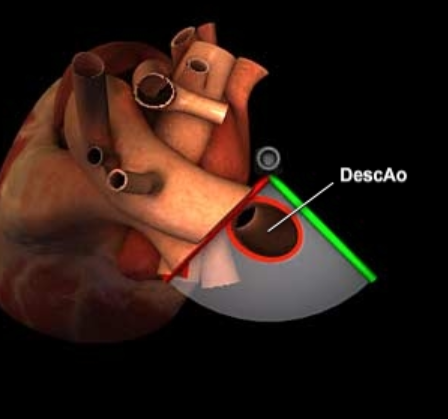
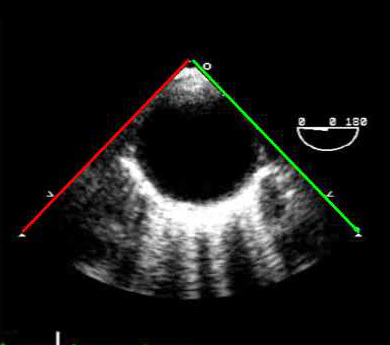
Mid-Esophageal Descending Thoracic Aorta Short Axis View
A transverse view of the thoracic aorta can be obtained anywhere along the mid to distal esophagus. From the transgastric or mid-esophageal views, ensure the Omniplane is at 0° and rotate the probe toward the left side of the patient (the descending thoracic aorta passes to the left of the esophagus). The probe may need to be withdrawn to just above the diaphragm as abdominal gas can interfere with visualization. Once a view is obtained, the probe can be slowly withdrawn to follow the descending aorta to the arch.

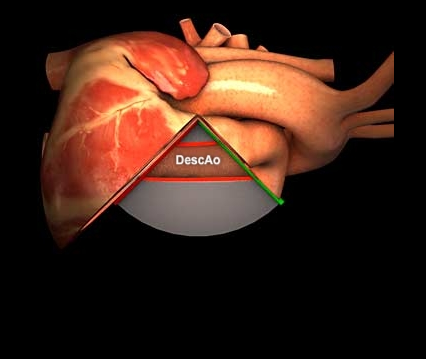
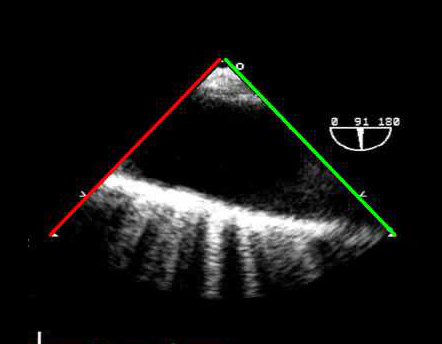
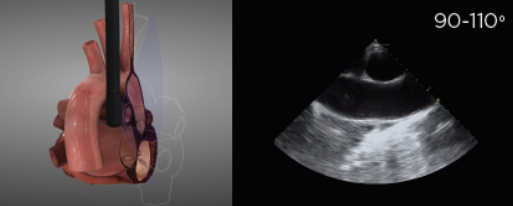
Mid-Esophageal Descending Thoracic Aorta Long Axis View
To obtain a long axis view of the descending thoracic aorta, while maintaining the same leftward rotation of the probe as for the descending aorta short axis view, the Omniplane should be adjusted to 90°-100°. On some machines, additional features may be available which allow you to simultaneously visualize the long and short axis images simultaneously, side-by-side on the screen.
https://www.resuscitativetee.com/protocols

Upper Esophageal Aortic Arch Short Axis View
From the mid-esophageal descending thoracic aorta long axis view, withdraw the probe until the long axis view of the descending aorta transitions into the more short axis view of the aortic arch. At this point the aortic arch passes anteriorly to the esophagus, and the probe will need to be turned toward the right or clockwise allowing the probe head to again face anteriorly to slightly to the right of the patient to capture the mid to proximal aortic arch. As the left mainstem bronchus travels between the esophagus and aortic arch, air contained within the bronchus may obscure visualization of the distal ascending aorta and proximal arch. If visualized, a long axis view of the right pulmonary artery will be visualized as well as the pulmonic valve and a short axis view of the aortic arch.
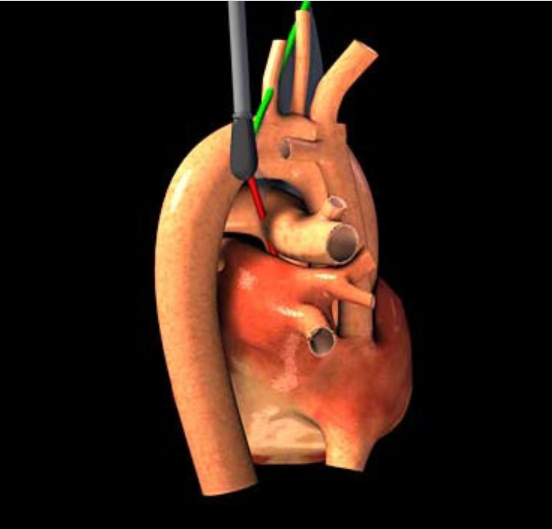
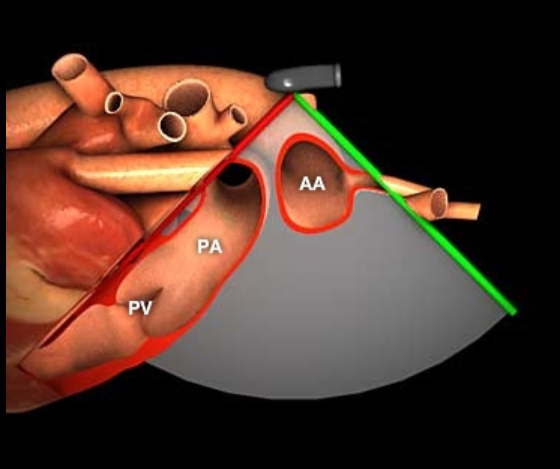

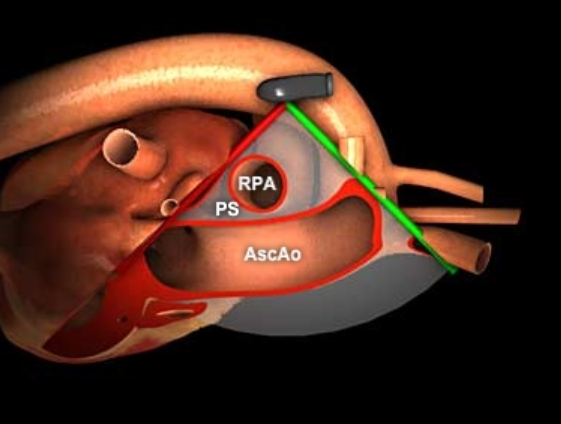
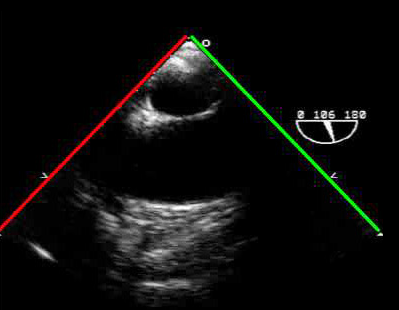
Mid-Esophageal Ascending Aorta Long Axis View
Maintaining the rotation of the entire probe toward the patient’s right and the 90-100° Omniplane angle, insert the probe toward the mid-esophageal positioning (probe head depth 30-40 cm) for long axis evaluation of the ascending aortic arch and a short axis view of the right pulmonary artery.
https://www.resuscitativetee.com/protocols
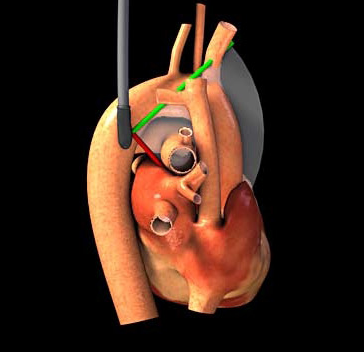
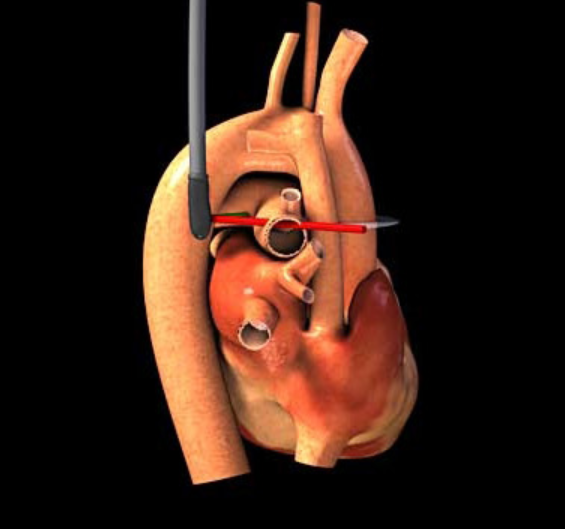
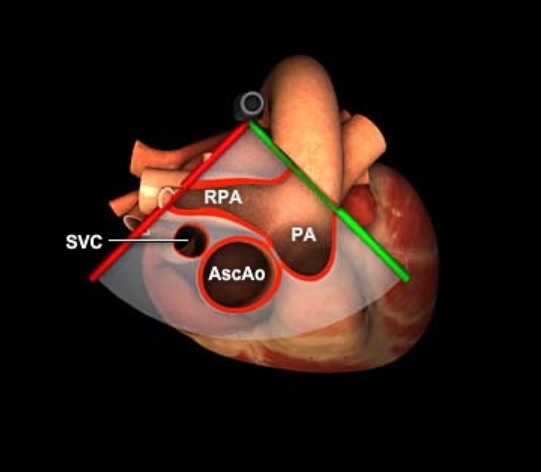
Mid-Esophageal Ascending Aorta Short Axis View
From the mid-esophageal ascending aorta long axis view, adjusting the Omniplane to 0° will allow for viewing the ascending aorta in the short axis. The main and right pulmonary arteries will be seen wrapping around the aorta.

https://www.resuscitativetee.com/protocols


References
Huis in ’t Veld MA, Allison MG, Bostick DS, et al. Ultrasound use during cardiopulmonary resuscitation is associated with delays in chest compressions. Resuscitation. 2017;119:95-98. doi:10.1016/j.resuscitation.2017.07.021
Clattenburg EJ, Wroe P, Brown S, et al. Point-of-care ultrasound use in patients with cardiac arrest is associated prolonged cardiopulmonary resuscitation pauses: A prospective cohort study. Resuscitation. 2018;122:65-68. doi:10.1016/j.resuscitation.2017.11.056
Hahn RT, Abraham T, Adams MS, et al. Guidelines for Performing a Comprehensive Transesophageal Echocardiographic Examination: Recommendations from the American Society of Echocardiography and the Society of Cardiovascular Anesthesiologists. J Am Soc Echocardiogr. 2013;26(9):921-964. doi:10.1016/j.echo.2013.07.009
Guidelines for the Use of Transesophageal Echocardiography (TEE) in the ED for Cardiac Arrest. Ann Emerg Med. 2017;70(3):442-445. doi:10.1016/j.annemergmed.2017.06.033
Teran F, Dean AJ, Centeno C, et al. Evaluation of out-of-hospital cardiac arrest using transesophageal echocardiography in the emergency department. Resuscitation. 2019;137:140-147. doi:10.1016/j.resuscitation.2019.02.013
Use of Transesophageal Echocardiography (TEE) in the ED for Shock, Cardiac Arrest, and Procedural Guidance. Accessed August 30, 2023. https://www.acep.org/patient-care/policy-statements/use-of-transesophageal-echocardiography-tee-in-the-ed-for-shock-cardiac-arrest-and-procedural-guidance
Reardon RF, Chinn E, Plummer D, et al. Feasibility, utility, and safety of fully incorporating transesophageal echocardiography into emergency medicine practice. Acad Emerg Med. 2022;29(3):334-343. doi:10.1111/acem.14399
Wray TC, Schmid K, Braude D, et al. Safety of Transesophageal Echocardiography Performed by Intensivists and Emergency Physicians in Critically Ill Patients With Coagulopathy and Thrombocytopenia: A Single-Center Experience. J Intensive Care Med. 2021;36(1):123-130. doi:10.1177/0885066619887693
Kallmeyer IJ, Collard CD, Fox JA, Body SC, Shernan SK. The Safety of Intraoperative Transesophageal Echocardiography: A Case Series of 7200 Cardiac Surgical Patients. Anesth Analg. 2001;92(5):1126. doi:10.1097/00000539-200105000-00009
Sainathan S, Andaz S. A systematic review of transesophageal echocardiography-induced esophageal perforation. Echocardiogr Mt Kisco N. 2013;30(8):977-983. doi:10.1111/echo.12290
Hussein L, Rehman MA, Jelic T, et al. Transoesophageal echocardiography in cardiac arrest: A systematic review. Resuscitation. 2021;168:167-175. doi:10.1016/j.resuscitation.2021.08.001
Chang JE, Min SW, Kim CS, Lee JM, No H, Hwang JY. Effect of Jaw Thrust on Transesophageal Echocardiography Probe Insertion and Concomitant Oropharyngeal Injury. J Cardiothorac Vasc Anesth. 2015;29(5):1266-1271. doi:10.1053/j.jvca.2015.02.003
Authorship
Written by Justine Milligan, MD, PGY-4, University of Cincinnati Department of Emergency Medicine
Peer Review by Lori Stolz, MD, Ultrasound Director, University of Cincinnati Department of Emergency Medicine; Meaghan Frederick, MD, Ultrasound Faculty, University of Cincinnati Department of Emergency Medicine
Posting and Revision Notes
Originally Posted: 9/15/2023
Last Update: 9/15/2023


